Went flying about 4pm this afternoon. It was cool, 60 degrees, crystal clear, with a 5 mph breeze straight down runway 23. Cruising at 77mph, and 2100 RPM, the CHT was about 345 degrees F.
Sunday, November 19, 2023
1/2 Hour Flying - Beautiful Cool Afternoon
Thursday, November 16, 2023
Nice Warn Afternoon Flight
I had to get something from the hangar, for my son, so I went early and had a nice late afternoon flight, for almost 1 hour. It was about 70 degrees with a gentle breeze down the runway. I left the traffic pattern for a while and flew around south of the airport.
Coming back I noticed this pipeline running north, east of the airport. They keep a wide path clear so they're easy to find and follow. They're also shown on the sectional charts. Them, high power line clearings and expressways are great navigation aids when traveling in these tree covered states down south.The airport is between me and Merry Mountain.
I mentioned the mountains on the west side of the traffic pattern the other day. Here's what Merry Mountain looks like at traffic pattern altitude on the crosswind for runway 5.
Looking south was hazy from smoke that came from somewhere way south of us.
Tuesday, November 14, 2023
Cool Evening Flight
Yesterday I went for a nice evening flight. It was a cool 55 deg. I wore my fleece vest under my leather jacket, which kept my shoulders warm. I should have also worn a sweater, my left arm got very cold, but it was fun anyway. The wind was 8 knots from a little left of runway 23. Once in the air it was very smooth. I didn't leave the traffic pattern, I only had 40 minutes until sunset, so I just went around the airport.
Looking NE from the left downwind for 23.Looking North, the white building is a book warehouse. It's an easily spotted reference, except when it snows, which isn't often.
Wednesday, November 8, 2023
Finally Back To Flying
We had a beautiful evening, more like late afternoon without Daylight Time. I flew for half an hour and everything worked fine except my camera. I think the memory card is full. I have not solved the Cylinder Head Temperature problem, it's still running hotter than it should. I had fun.
When I did my BFR I rented a friends C172. It does not fly like the Fly Baby. It took a while to work out the traffic pattern positions, but we got there. The first landing I was almost stopped when we realized the nose tire had gone flat. We got it on a creeper and carefully dragged it back to the hangar. A piece of safety wire had poked a tiny hole into the tube.
It's supposed to be nice tomorrow so maybe I can take some pictures.
Sunday, March 26, 2023
Airplane Ready To Fly
On March 16th I finally had everything back together and taxied the plane for about 10 minutes. Everything was fine, except for a slight miss on the left magneto. Back in the hangar.
On March 18th we had a fly-in to celebrate the reopening of the runway. The winds at 3000 feet were 26 knots but we had a good turnout anywayToday I had time and 72 degree weather to work on the small misfire. I stared by pulling the lower plugs and cleaning them to assure there was not any oil fouling one of them. I also rechecked the gaps, all good.
Wednesday, March 8, 2023
Runway Closed Again
I've been going slow working on the valves because our runway is closed again. The wizards of smart, who designed the new runway, forgot to put an overun at the north end of the runway. As it was, as soon as you over ran the end of the runway you started down a 40 foot hill to the creek.
It's a huge pile of dirt. They've carved away every cubic foot of soil from around the runway. Originally they destroyed our grass taxiway along the west side of the south end of the runway to level the runway.
Now they've removed soil along the west side of the north end. At one time I could land in the grass south of the VASI panels, not now, it's gone.
Sunday, March 5, 2023
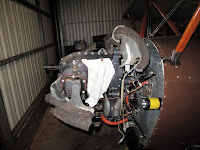
Removed Cylinders to Solve Sticky Valve
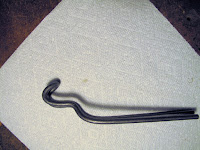
I decided to make a new tool for for removing the valve spring keepers. I tried buying one but didn't like what I found. Years ago I had modified the handle of my, 7th grade, tack hammer to do the job. It never worked great but it was my inspiration for this one. I had some 1/4" steel rod, like the hammer handle, so that's what I used.
The hooked end goes under the rocker arm shaft.
With the end hooked under the rocker shaft the tool is pressing on the spring retainer. To keep the valve from moving as you press down, the valves are resting on the flat top of this wooded block.
I took the new valve and stuck it in the guide from the top to see how far in it went before sticking. It stopped about 1/4" from the bottom of the guide. It should have fallen all the way down. The build up of carbon stopped it.
I didn't want to use a power tool because I didn't want to accidentally make the inside diameter too large and then have to get the guide replaced. It's a 7/16" diameter hole.
Get a dab on your finger and apply it to the sealing surface of the valve.
The lapping process is simple. With the valve tight to the seat you rotate the valve back and forth about 40 degrees until you feel it moving smoothly. You really feel the grit at first. Then move the valve off the seat, rotate 90 dregees and repeat. Keep doing this in sets of 4 90 degree moves until you barely feel the coarse grit.
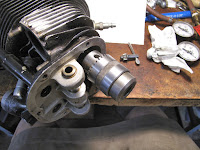
I didn't want to lubricate everything, put the piston back in and reinstall the cylinder on the motor just to leak ckeck it. Instead I made up a plate to seal the bottom of the cylinder. I used some scrap 1/8" steel, some 3/8" nuts and bolts from Tractor Supply, and some 1/8" cork gasket material glued to the steel plate.
There was no logic by which I can believe this was the only cylinder with carbon built up in the exhaust valve guide. I couldn't in good conscience put this one back on and ignore the others. Off with the next cylinder and repeat the process.
When putting cylinder 4 back on I couldn't get the hydraulic valve lifter to compress to get the shaft back through the rocker arm. I called my friend Caleb Glick, who has since died and will be sorely missed. He explained that the check ball in the plunger was stuck and that the plunger can be removed with a magnet, then cleaned. This involved removing the casting which has tabs cast in it to prevent the plunger falling out of the lifter.
The long piece on the left has the check valve in it. It lets oil flow through the lifter and up the push rod to lubricate the rocker and valve. I blew Brake kleaner in the small tube untill it was cleary open, then I oiled everything and put it all back together.
I found one of the lifters on cylinder 2 was not compressing so I took the cylinder back off and cleaned the check valve on it. All 8 lifters are now working fine.
After the first lapping the valve had some leakage. I blued the sealing surface on the new and old valves, installed them with no compound, and only oscillated it a few degrees. There was a small low spot on the seat which needed some more lapping.
I also found that the new valve had some chatter in the original grinding. The 3 arrows point at high spots you gan see in the bluing. Chatter basically leaves little flat segments with corners between them. The little high spots, corners, cause leakage until the lapping smooths them down.
With the valves working the cylinders are back on and pressure checked just to be sure, all 4 were good.


