Showing posts with label Paint. Show all posts
Saturday, March 23, 2019
Tail and Wing Rigging Adjusted
The wing rigging was adjusted first. I leveled the fuselage Fore & Aft on the top longeron, and side to side on top of the former at the back of the seat.
The upper wings are rigged flat, with no twist, so I strung a tight string between the tops of the outboard wing struts. The center section was adjusted level, then each upper wing panel. With everything adjusted the sting is 3/8" below the fabric and even all the way between the struts.
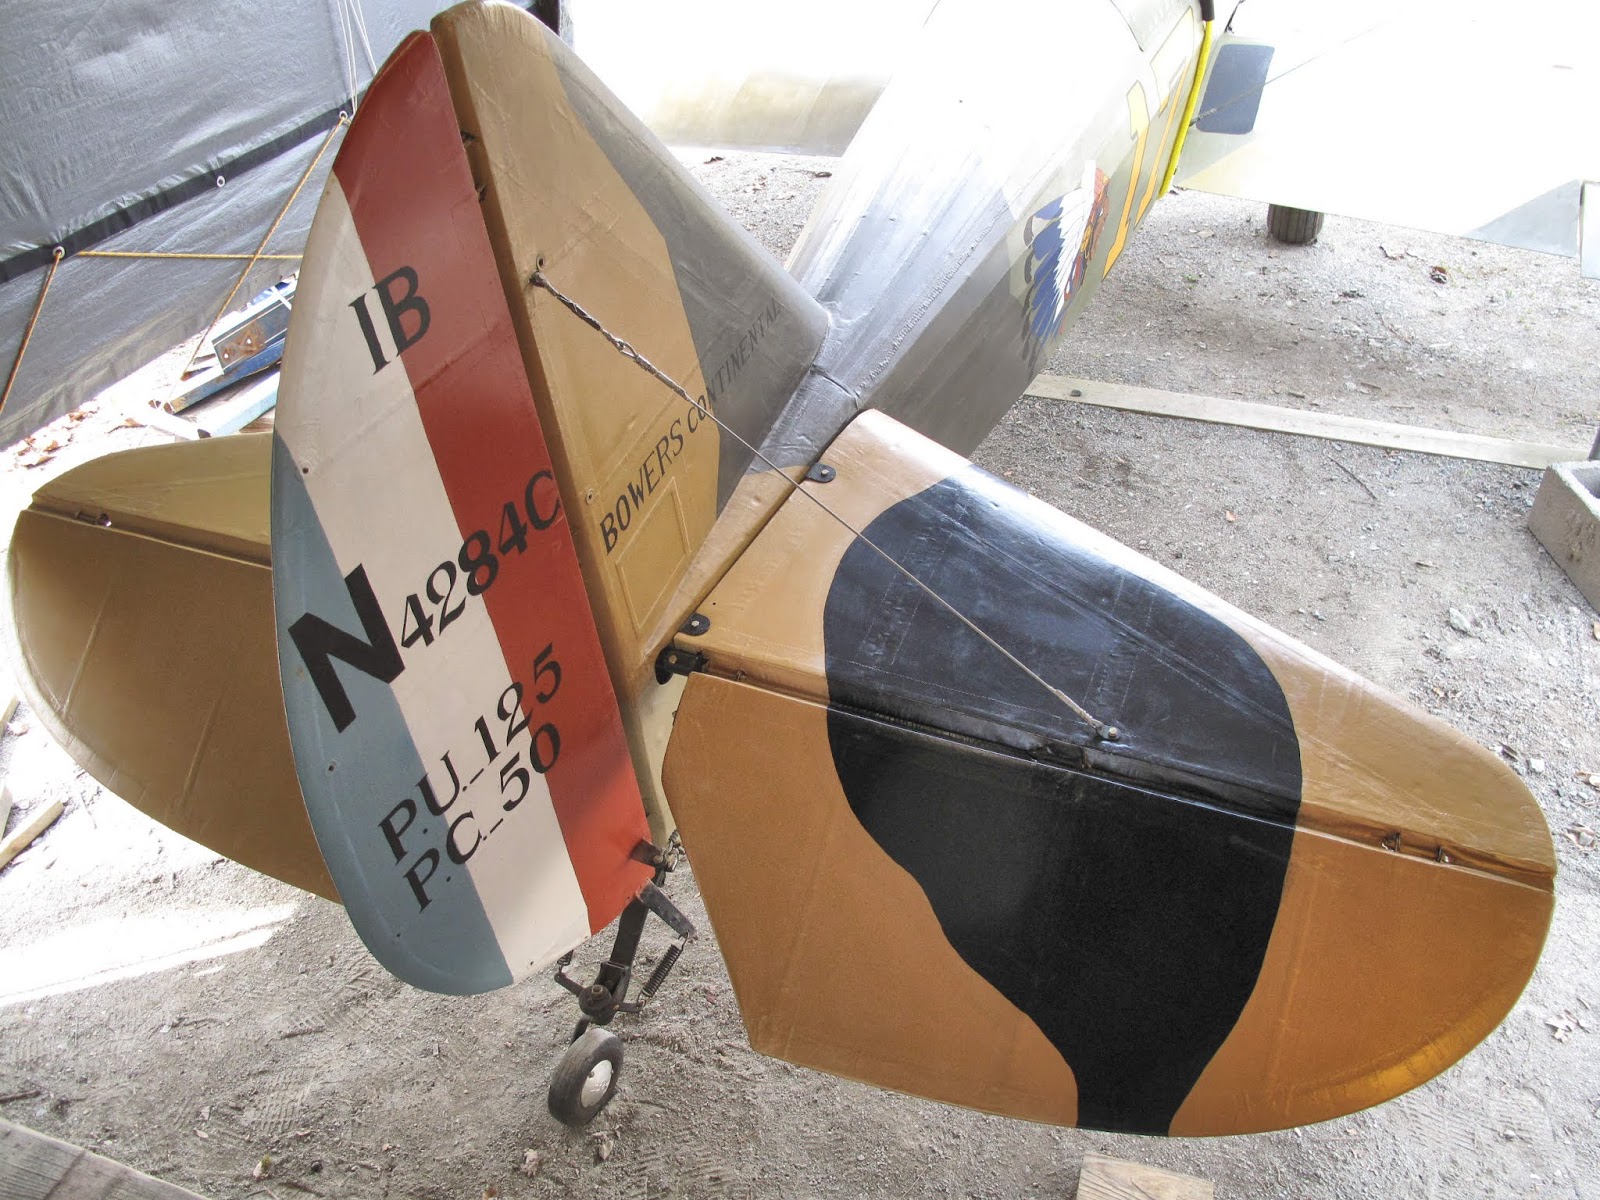
The first brace wires were made for the tail without my 2x4 Cable Fixture. They were both a little short. New cables were made using the fixture and fit perfectly. The horizontal surfaces are level and square to the fin.
I've adjusted the elevator travel to have 20 degrees down and 35 degrees up.
Really looking like an airplane now. This is the first I've seen the paint job with the the plane assembled. There is a slight difference in some of the colors between the wings, Poly-Tone, and Fuselage/Tail, Dope. If I were doing this again I would do it all in Ceconite so I could use dope for all the finish. The fabric on the fuselage and tail has now been there 20 years so I'll be recovering them soon, probably this fall.
I really like the look. The idea was, what would our Fly Baby look like if I had Kellner, SPAD Sub Contractor, paint it while they were painting SPADs in WWI, with the markings of the 103rd Aero Squadron added.
I need to get this thing done.
Labels:
General Info,
Paint,
Rigging,
Tools
Sunday, August 13, 2017
Better Paint Mix and Second Coat on the RH Upper Wing
When I mixed a new batch of light green, I realized I had made some mistake with my spreadsheet for calculating the pigments. It was causing the quantities of pigments to be so low the paint was watery. I had seen this with the red, blue and black, but it was much worse with the green. I spent the morning re-measuring all my pigments by weight and volume to determine their density. I needed this to correctly convert my weight (gm) measurements into volume (ml) measurements so I could use measuring scoops.
When I first mixed the colors I had access to a very accurate scale. All I have now is a small kitchen scale which is not accurate enough to measure such small quantities. Most of the pigments come in 175 ml jars so I have large enough quantities to work out the density with the kitchen scale.
The densities are:
Lamp Black 0.17 gm/ml
Aluminum Powder 0.27
Prussian Blue 0.55
Alizarine Crimson 0.66
Litopone 0.83
Burnt Sienna 0.87
Chrome Yellow 0.87
Chrome Orange 1.18
When I mixed the colors I used about 4 times as much pigment as my attempt with the Light Green, which was what I found with the black. The colors still match and the paint covers much better.
The color mixes here are for Light Green, Beige, Red and blue. Each has about 25 ml of pigment for a quart of Poly-Tone. The Alizarine did not want to mix well with the Poly-Tone but the color seems to match my old samples.
We had another warm dry afternoon so I started the numbers on the lower left wing, and did the red and blue on the roundels.
The upper right wing got a second coat on all the colors. The red and yellow need another coat and then I can outline the numbers.
After 26 years it's nice to see this paint job getting close to being done. I really like the look.
When I first mixed the colors I had access to a very accurate scale. All I have now is a small kitchen scale which is not accurate enough to measure such small quantities. Most of the pigments come in 175 ml jars so I have large enough quantities to work out the density with the kitchen scale.
The densities are:
Lamp Black 0.17 gm/ml
Aluminum Powder 0.27
Prussian Blue 0.55
Alizarine Crimson 0.66
Litopone 0.83
Burnt Sienna 0.87
Chrome Yellow 0.87
Chrome Orange 1.18
When I mixed the colors I used about 4 times as much pigment as my attempt with the Light Green, which was what I found with the black. The colors still match and the paint covers much better.
The color mixes here are for Light Green, Beige, Red and blue. Each has about 25 ml of pigment for a quart of Poly-Tone. The Alizarine did not want to mix well with the Poly-Tone but the color seems to match my old samples.
We had another warm dry afternoon so I started the numbers on the lower left wing, and did the red and blue on the roundels.
The upper right wing got a second coat on all the colors. The red and yellow need another coat and then I can outline the numbers.
After 26 years it's nice to see this paint job getting close to being done. I really like the look.
Thursday, August 10, 2017
Colors on Wings
The afternoons yesterday and today were both nice and dry for painting. Yesterday I got the second coat of all the colors on the top of the lower wings.
I also got started on the red in the roundels. The green stripes are squadron stripes for the 103rd Areo Squadron. They still need red stripes between the green.
In the evening when it was too damp to paint to paint I drew all the color boundaries on the top of the upper wings.
Today I was able to get the first coat on the top of both wings. When the colors are done I'll add a black border around the numbers.
The upper right wing gets the same green and red stripes as the lower left.
I got the numbers drawn on the lower right in the evening today, but it was too damp to paint them. Odds are I won't get to do any more painting until mid September.
I did get the gasket set for the engine so I can pull the cylinders to check for rust. I've only got about 125 hours since the overhaul so I don't want to risk damaging the engine.
Sunday, August 6, 2017
Painting the Camouflage Colors on the Wings
The weather has dried out for a couple days so I finally got some color on the top of the wings. I bought 4 gallons of the clear Poly-Tone base so I can mix my own colors. I also bought a quart of Blush Retarder to slow the drying and help with mixing the pigments. Austin at Preferred Air Parts was very helpful.
I found a plastic lid, at the hardware store, for the gallon can which has a small poor spout. It allows me to easily poor small amounts of the base without making a mess.
Based on my color formulas I measure the pigments into my mortar. This mix is for making 1 quart of the dark brown, Chestnut, color. It uses Lamp Black, Chrome Orange, Chrome Yellow, Burnt Sienna, and Alizarine Red.
When I did this with dope I used one of the plasticizers for mixing the pigment. With Poly-Tone I used some blush retarder, 4 teaspoons for a quart of Poly-Tone. It gave me a liquid which wouldn't dry quickly while grinding the pigments and it helps the Poly-Tone flow out the brush marks before it drys.
You grind the pigments with the pestle until you get a good even color mix. You can see the color change as you grind it together.
The hardware store sells empty paint cans. My little paint spatula bends nicely to scrape most of the mix from the mortar. When I did this with dope I used a little thinner to wash the last of the pigments from the mortar. The Poly-Tone is already very runny so I didn't want to add thinner. Instead I cleaned it a couple times with a couple tablespoons of the clear Poly-Tone. It worked pretty good but I didn't get it as clean as with thinner so I used 1/4 more pigments to allow for some not getting to the can.
Once the pigment mix was in the can I added the aluminum powder. For this color it takes 14.75 ml, 3 teaspoons of aluminum.
Then I fill the can 1/2 with Poly-Tone and shake it vigorously for 3 minutes. I don't know if less will work as well but 3 minutes is all my arms can take. I then finish filling the can and shake it another minute. The Poly-Tone is so runny you need to stir it often while painting.
I start with the lightest color and work to the darkest so each color can overlap about 1/4". The beige seems a little lighter than the dope on the fuselage but the other colors match very well. 2 coats seem to get a good even color.
The process is pretty simple. I draw the pattern on the surface with a soft lead pencil, which won't bleed through the Poly-Tone. The patterns used by each of the SPAD subcontractors were so consistent that they must have had a pattern they traced for each surface. Mine were free handed from my sketch.
I mixed a quart of each color, except Black for which I only made a pint. It looks like I'll need another quart or 2 of beige and light green. Originally I planned to mix a gallon of each of these colors but I'll never use that much.
I finished the center section and ailerons. I've got one coat on the top of the lower wings, none on the upper wings.
I did find the Poly-Tone a pain to brush compared to dope. It runs easily and you get bubbles easily while brushing. I'm getting the hang of it and it looks great. I really like the look. Because of the aluminum powder you see every brush stroke so it has much more life to it. It also looks Like WWI French Camouflage would have looked.
Sunday, July 16, 2017
Painting Roundels and Center Section Installed
The grand kids, Rowan and Duncan, visited for a couple weeks around Independence day. We had a nice dry day near the end of June so we started painting the roundels on the lower wings. We made a cardboard pattern and drew the circle with pencil on the wings. As with the rest of the SPAD paint scheme the roundels were brushed on. One thing we learned was, unlike dope, Poly-Tone really softens the the paint you're applying it to. It will take at least 2 coats of white to get the cream not to show. They had fun and we made progress.
The weather has been mostly hot and humid. Today wasn't to bad so I installed the center section. We fit the center section to each wing before installing it just to make sure I put all the fittings back on correctly. Everything fits nicely. Once the cowl is permanently installed I can safety wire the turnbuckles. Nice to be putting things back together.
Tuesday, May 16, 2017
Wing Lower Surfaces Painted
We had a beautiful warm dry day which allowed me to start painting the color on the wings. I decided, on the lower surfaces, to use Tuscon Cream with some Aluminum powder added to reasonably match the fuselage and tail. This seemed like I could get a good match without all the work. I added 4 Tablespoons of Aluminum Powder to a gallon of Poly-Tone. I like it but I should have added a lot more aluminum. It looked like a match until I painted it. If you look at the wing closest to the fuselage you can see I could have added a lot more aluminum. I never had good samples to match for this color so I'm leaving it even though I have enough Poly Tone to repaint everything. I'd rather get this done and back in the sky.
My next bit is to start on the markings. I need White under the Red and Blue.
Thursday, January 19, 2017
Remaining Wing Rigging Fittings Painted
I finished painting the rest of the wing fittings and they're cooling down in the oven after baking all afternoon. I had some trouble painting the zinc chromate with my old air brush. I've ordered a new one and it should be here tomorrow. With the last of the fittings painted I can now install new cables on the 6 main ones. I can't finish installing the cowling until the 2 forward flying wire fittings get bolted to the fuselage. We're getting there.
Monday, January 16, 2017
Painting Wing Fittings
I've been grit blasting and painting all the fittings for attaching the wings, struts, etc. This is about half of them. After painting with Zinc Chromate primer and Black Enamel I load them in my oven and bake them. The four 100 watt bulbs get it to 225 - 250 degrees F which cooks them nicely in about 2 hours.
Thursday, December 22, 2016
Head Rest and Baggage Compartment
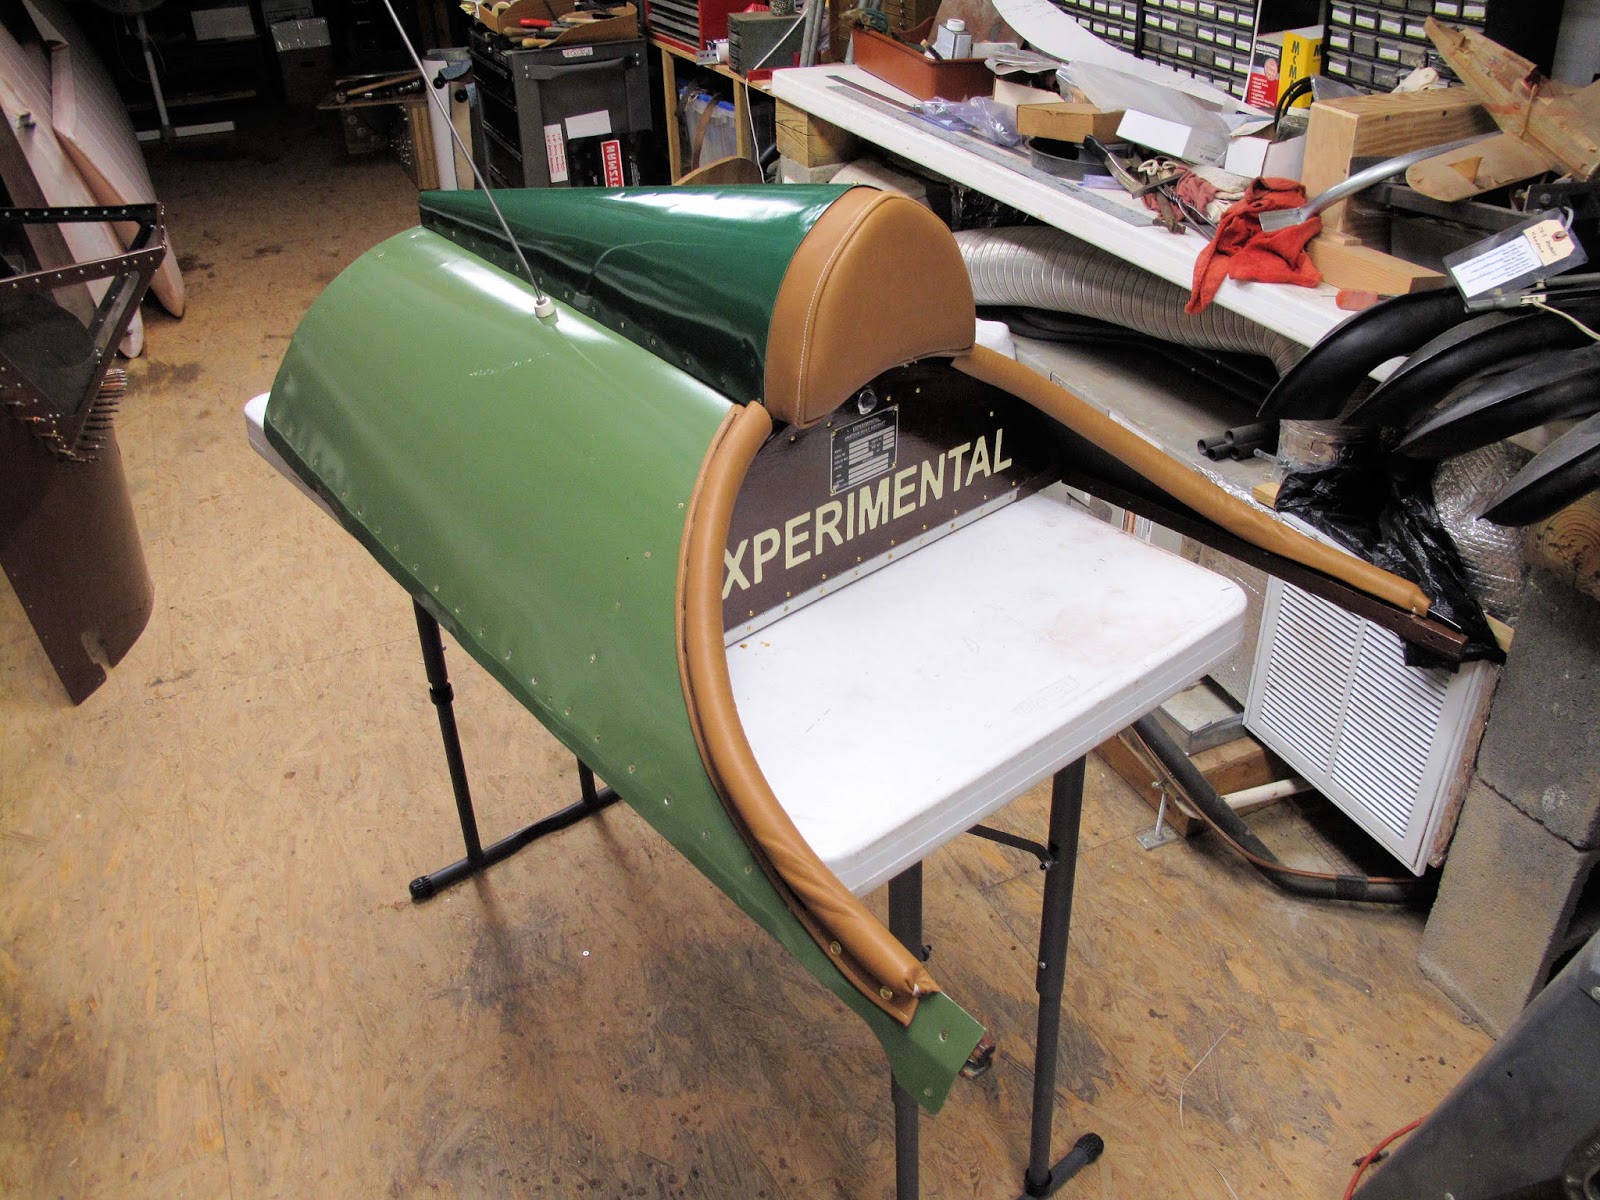
The plan for the headrest and baggage compartment was to repaint the aluminum, replace the headrest cover with leather, to match the seat, and then use some of that leather to cover the cockpit coaming.
When I removed the sheet metal I found many of the joints on the headrest had come undone. The gussets were fine it was the joints on the bulkhead and cross piece which did not hold. None of these had the snug fit required for Resorcinol glue. I cleaned them up and re-glued them with epoxy. They should last this time.
I used a piece of 2" foam rubber for the padding.
I sewed up a new headrest cover from the seat leather.
The cover was nailed to the bulkhead using my brad nailer.
There were also some loose joints in the baggage compartment frame so I re-glued them and painted the inside white to make it a little brighter inside.
The aluminum pieces were stripped, sanded and repainted. I painted the inside of the cockpit area flat black and the inside of the baggage compartment white.
The aluminum pieces were screwed back onto the frames with brass screws. Steel crews just get rusty in wood.
The headrest is screwed to the skin of the baggage compartment.
The baggage door was covered with Naugahyde. I decided to cover it with a piece of 1/16" mahogany plywood. My original plan was to stain it with a dark stain, then mask the word Experimental (required by regulations), sand blast away the stain on the letters, and varnish it. That all worked perfect but the color of stained mahogany is not enough darker to see the difference once it's been varnished. This would have worked with birch plywood.
Instead I painted the text a cream color and moved on. I didn't want the word Experimental on the outside of the plane.
I had pre-drilled all my screw holes and then sprayed the door and the wood with contact cement.
The problem was how to get all the holes aligned as the 2 parts mated because there is no moving it once they tough. I used some pin punches to align them at the bottom as I brought them together.
A couple clecos were used at the top and then the parts were pressed tightly to set the glue.
It worked and all the holes matched.
The frame for the cockpit coaming is a piece of 3/8" steel tubing Pop-riveted to the aluminum skin. It worked as good as a rolled edge. You probably don't want to stand on it but it's been there since we widened the fuselage with the stringers, and the skin has no wrinkles after about 45 years.
To cover the structure we used a piece of 3/4" heater hose. The hose was split so the curve naturally fit the coaming. There isn't room for it to fit on the inside so it needed some of the hose removed at the ends. If I were making new skins I would make them just tall enough to avoid the fit problem at the forward end.
Originally we had Naugahyde glued over the tube and wrapped to the inside. That worked but I lost one of them while flying one day.
Before we widened the fuselage with the stringers we had the cover laced to the skin. That's how it's done on my WACO NINE so that's what I did this time. No more pieces blowing off in flight.
I cut 2 strips of 6" wide leather. I glued the folded edge, where the lacing will go, and then sewed near the edge for a finished look.
I found I had a problem gluing the ends to the hose. I wiped the hose with MEK and that let the contact cement stick.
I used the calipers to figure out where the front of the bulkhead was so I could locate a hole just in front of the bulkhead. I then located the rest of the lacing holes so they were evenly spaced. I punched 3/16" holes in the leather but drilled 1/8" holes in the aluminum so I could cleco the leather in place as I worked. Once I was ready to do the lacing I re-drilled the holes to 3/16".
To locate the holes in the leather on the inside I just pulled the leather tight down and put a tick mark at the bump made by the end of the cleco.
Once the holes were punched on the inside I used some 1/8" Pop-rivet washers to allow the clecos to hold the leather in position.
I used a 45" boot lace and started at the forward end so the knot would be in the baggage compartment. By having a hole just in front of the bulkhead the cord just wraps around the frame while lacing. The door doesn't fit so tight that the lace gets in the way.
I didn't worry about which end should be longer at the start in order to get even ends for tying the knot. Once it was laced I just worked some slack around to get the ends even.
I knotted the ends with a square knot locked with a half hitch on each side. It works.
I like the look and it's very secure.
At the forward end I located holes to use the skin crews to hold the leather. I got some brass upholstery washers and one size longer crews.
At the forward end I drilled a hole in the aluminum and pulled the leather tight with some rib stitch cord. Other than a small wrinkle in the leather I like it.
It's ready to go back on the plane.
The lock in the baggage door uses the glove box key from our old '58 Chevy Station Wagon that we used to haul the fuselage to Swartz Creek High School for a display back in '64. I think that's the station wagon we used to bring the engine home from Andy Anderson in Illinois. Ah the good old days.
When I removed the sheet metal I found many of the joints on the headrest had come undone. The gussets were fine it was the joints on the bulkhead and cross piece which did not hold. None of these had the snug fit required for Resorcinol glue. I cleaned them up and re-glued them with epoxy. They should last this time.
I used a piece of 2" foam rubber for the padding.
I sewed up a new headrest cover from the seat leather.
The cover was nailed to the bulkhead using my brad nailer.
There were also some loose joints in the baggage compartment frame so I re-glued them and painted the inside white to make it a little brighter inside.
The aluminum pieces were stripped, sanded and repainted. I painted the inside of the cockpit area flat black and the inside of the baggage compartment white.
The aluminum pieces were screwed back onto the frames with brass screws. Steel crews just get rusty in wood.
The headrest is screwed to the skin of the baggage compartment.
The baggage door was covered with Naugahyde. I decided to cover it with a piece of 1/16" mahogany plywood. My original plan was to stain it with a dark stain, then mask the word Experimental (required by regulations), sand blast away the stain on the letters, and varnish it. That all worked perfect but the color of stained mahogany is not enough darker to see the difference once it's been varnished. This would have worked with birch plywood.
Instead I painted the text a cream color and moved on. I didn't want the word Experimental on the outside of the plane.
I had pre-drilled all my screw holes and then sprayed the door and the wood with contact cement.
The problem was how to get all the holes aligned as the 2 parts mated because there is no moving it once they tough. I used some pin punches to align them at the bottom as I brought them together.
A couple clecos were used at the top and then the parts were pressed tightly to set the glue.
It worked and all the holes matched.
The frame for the cockpit coaming is a piece of 3/8" steel tubing Pop-riveted to the aluminum skin. It worked as good as a rolled edge. You probably don't want to stand on it but it's been there since we widened the fuselage with the stringers, and the skin has no wrinkles after about 45 years.
To cover the structure we used a piece of 3/4" heater hose. The hose was split so the curve naturally fit the coaming. There isn't room for it to fit on the inside so it needed some of the hose removed at the ends. If I were making new skins I would make them just tall enough to avoid the fit problem at the forward end.
Originally we had Naugahyde glued over the tube and wrapped to the inside. That worked but I lost one of them while flying one day.
Before we widened the fuselage with the stringers we had the cover laced to the skin. That's how it's done on my WACO NINE so that's what I did this time. No more pieces blowing off in flight.
I cut 2 strips of 6" wide leather. I glued the folded edge, where the lacing will go, and then sewed near the edge for a finished look.
I found I had a problem gluing the ends to the hose. I wiped the hose with MEK and that let the contact cement stick.
I used the calipers to figure out where the front of the bulkhead was so I could locate a hole just in front of the bulkhead. I then located the rest of the lacing holes so they were evenly spaced. I punched 3/16" holes in the leather but drilled 1/8" holes in the aluminum so I could cleco the leather in place as I worked. Once I was ready to do the lacing I re-drilled the holes to 3/16".
To locate the holes in the leather on the inside I just pulled the leather tight down and put a tick mark at the bump made by the end of the cleco.
Once the holes were punched on the inside I used some 1/8" Pop-rivet washers to allow the clecos to hold the leather in position.
I used a 45" boot lace and started at the forward end so the knot would be in the baggage compartment. By having a hole just in front of the bulkhead the cord just wraps around the frame while lacing. The door doesn't fit so tight that the lace gets in the way.
I didn't worry about which end should be longer at the start in order to get even ends for tying the knot. Once it was laced I just worked some slack around to get the ends even.
I knotted the ends with a square knot locked with a half hitch on each side. It works.
I like the look and it's very secure.
At the forward end I located holes to use the skin crews to hold the leather. I got some brass upholstery washers and one size longer crews.
At the forward end I drilled a hole in the aluminum and pulled the leather tight with some rib stitch cord. Other than a small wrinkle in the leather I like it.
It's ready to go back on the plane.
The lock in the baggage door uses the glove box key from our old '58 Chevy Station Wagon that we used to haul the fuselage to Swartz Creek High School for a display back in '64. I think that's the station wagon we used to bring the engine home from Andy Anderson in Illinois. Ah the good old days.
Subscribe to:
Posts (Atom)