Sunday, May 12, 2019

A New Cockpit Cover

Our old cockpit cover was just that, it covered the windshield and cockpit opening.  I wanted a cover which would include the engine, and cover the gas cap.  We had gotten rain in the gas tank and I had a bird get into the air inlet on the cowl.  It seemed easy enough to prevent both of these. 

This new cover is made in 2 pieces.  It splits at the Firewall, just in front of the Cabane Struts.  The 2 halves are joined with Velcro.  The aft section laps over the nose section.  I put the loop half of the Velcro on the bottom of the aft section.  That way if I only install the aft section, like when it's in a bird free hangar, the Velcro shouldn't scratch the paint as easily.
 I made my pattern with a cheap blue tarp, I new they were good for something.  Seams were taped together with 2" masking tape and the pieces were taped to the plane with Blue Painters Tape so I wouldn't peal up any paint. 

I didn't worry that the seams in my blue pieces had to be exactly where I wanted them on the actual pieces.  I drew where I wanted to cut the pattern with a felt marker.  If you have a small gap in the pattern use masking tape on both side to fill the gap.  That way the tape doesn't stick to the plane.
 You need to add pleats, little folds, to form the cover to the the curves of the nose cowl, etc.  Mark them with a felt marker than tape them in place.  Later when I flattened the pattern pieces I carefully cut the tape to unfold the pleats.  Much easier than removing the tape.
 I used a piece of webbing folded near the center to hold the nose cover around the Air Box outlet tube.  The strap is sewn to the right hand panel and Velcro holds it to the left.  The right panel overlaps the left with Velcro to join them.
 The pattern fits nicely.  After I took these picture I taped on pieces of webbing which wrap around under the plane to hold the cover down.  This allowed me to work out the length of the straps and where I wanted Velcro.


 At home the pattern was cut apart and flattened.  I arranged the pieces on my cover fabric.  I've used a boat cover material called Surlast from Sailrite in Columbia City, Indiana.  They're in northern Indiana, nowhere near water.  We've been buying from them since our hang glider days in the early 70's.  It's do it yourself heaven.

The pieces were cut out leaving as much space as possible for seams and hems.

 Each pattern piece was then drawn on the back of the panel with a felt marker.  You might have to use pencil on light colored fabric.

A 5/8" edge was then added for seams and hems.  By making them all the same it makes it easier when aligning panels for sewing.
 I used Seamstick basting tape to hold all the seams for sewing.  It doesn't have a strong grip, but it works.  They have a much stronger 3M version for twice the price.  I have a walking presser foot sewing machine, which I love.  By using basting tape you can do this just fine with a cheap sewing machine, which I did for years.  You will need a #110 needle to sew the heavier thread.

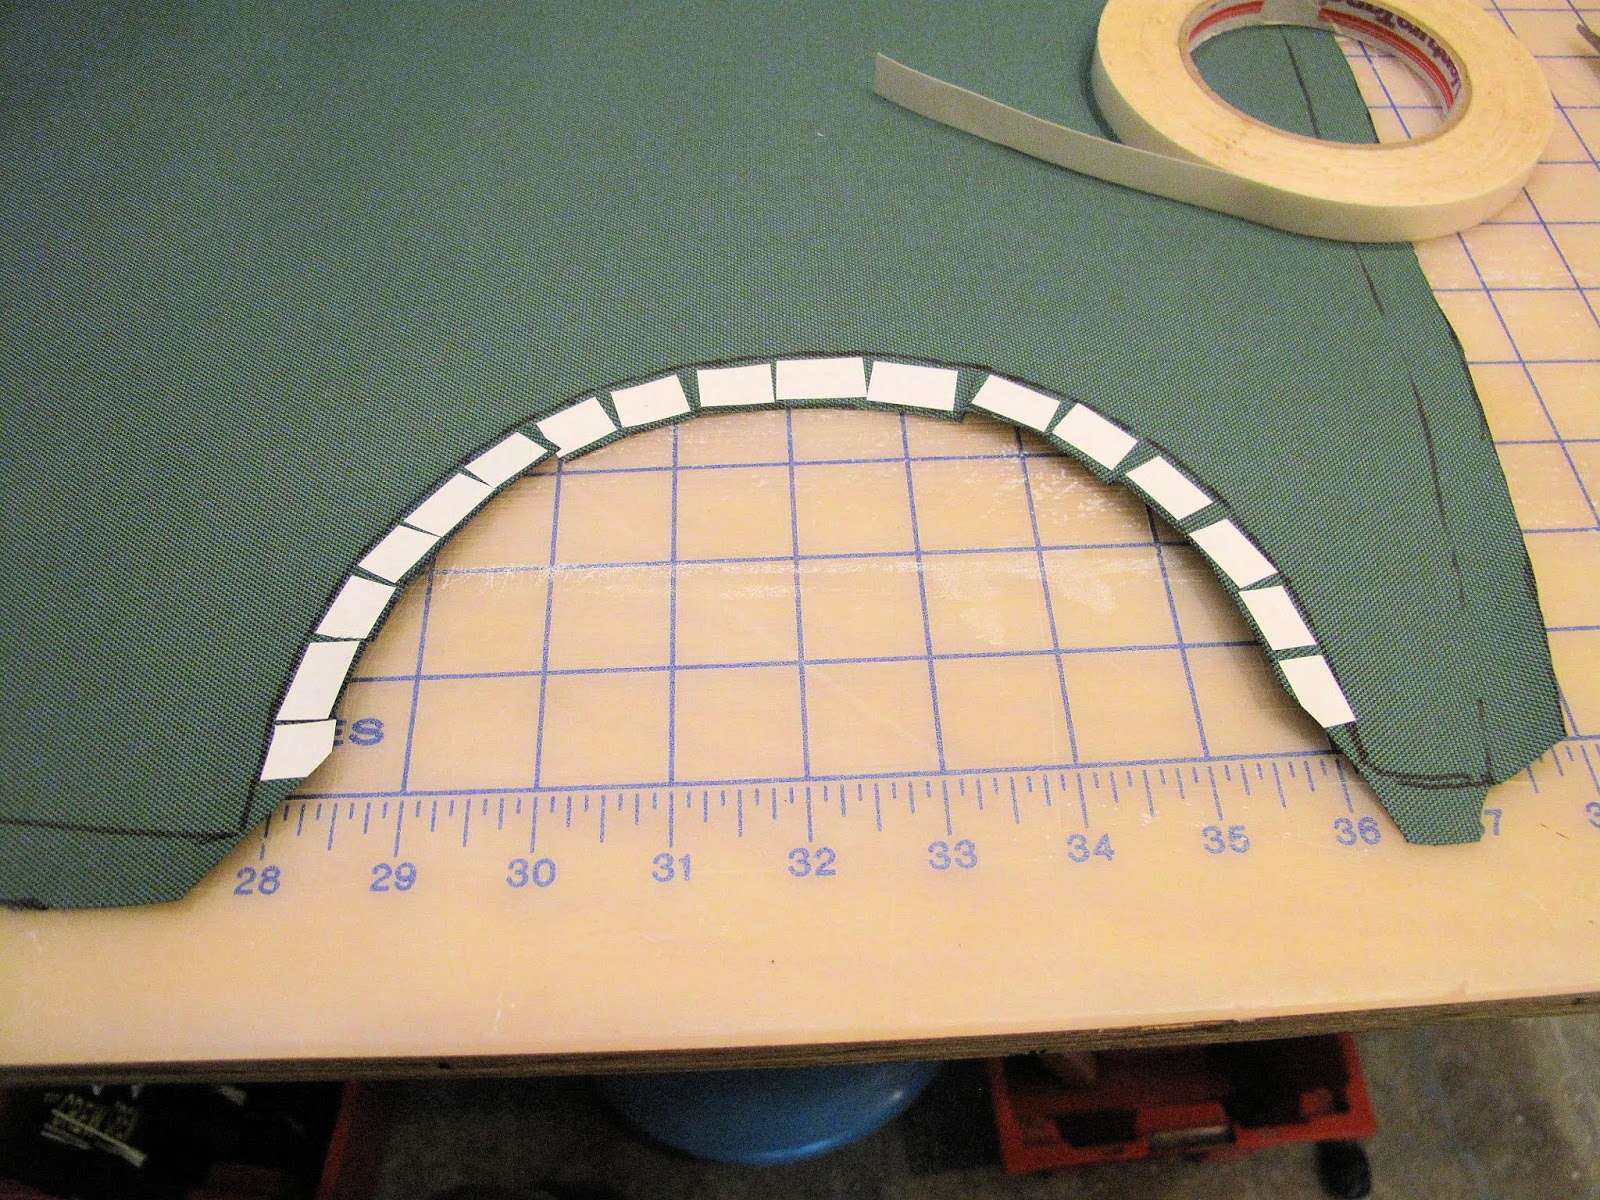
For this curved section I used a lot of little pieces of tape to hold all the tabs for sewing.


 When sewing the cover I sewed pleats first, then anything which was easier sewn on a small panel before I sewed panels together.

There are few wrinkles.  You can easily rip out a seam and fix wrinkles or ignore them as I did with this one on the nose.

 The cutout for the prop started round but the pull of the fabric made it oval.

 The wrinkle on this corner of the cowl left the outside edge loose so I ripped out the seam and moved it to pull the corner tight.

 The straps, 1-1/2" polypropylene, are sewn on one side of the cover and attach with Velcro to the right side.  The straps are both on the main rear piece in case the front piece is not installed.  Sailrite  has 2" webbing but we use the 1-1/2" for our airline baggage tags, so I had it available.

To get around the forward struts there is a split which closes when the panels are stuck together.

To reduce water under the cover at each strut there is a little dam turned up above the strut opening, to direct water around the strut.


 To get the cover around the aft struts there is a slit which closes with Velcro.  I added a little tab of webbing between the cover and the hook Velcro to make opening the joint easier.
 I made the sides straight along the bottom edge.  To hold the middle of that edge down better I added a snap at the bottom of the windshield frame.  I could have made that side edges with a (catenary) curve but it would have made the panels bigger and used more fabric.

I placed the snap on the lowest screw hole for the glass retainers.  I had planned to use the last hole in the cowl panel but I used #8 nut plates inside and the snaps only fit a #6 screw head.

I reinforced the snap with a piece of webbing.


 I did add a cover over the gas cap.  It has 8 pleats and is sewn on top of the cover to shed water better.
I used more snaps at the aft end to fit around the dented headrest, as we did on the last cover.  The dent is from when I fell off the wing and added the hand holds, I'll fix it.

Some day when I'm bored, with nothing to do I'll fix the remaining wrinkles.  Until then it works as I wanted so I'm delighted, wrinkles and all.

Monday, April 29, 2019

Cub Scout Day at the Airport


 Saturday we hosted the Cub Scouts at Gordonsville airport.  My granddaughter Rowan helped me in the morning to get the Fly Baby and the WACO NINE set up to help the Scouts learn about airplanes.  She had to leave before the scouts arrived.

The weather was great and a good time was had by all.

 We set up the WACO so all the parts were arranged in their proper location.  I think it was hard for some of the kids to appreciate that the Motor is over 100 years old.

We had the planes setting at the front corner of the hangars where they couldn't miss them.


 On the other corner of the taxiway Bill had his Fly Baby in WWII British camo.

All the bolts are in the wings and the Machine Gun installed.  I still have a few things to hook up and do a new weight and balance.

Friday, April 26, 2019

At the Airport


 The trailer was originally made when we had 6.00 x 6 wheels and tires.  The current 8.00 x 4 wheels and tires are wider and rub on the side rails of the trailer.  The 2x8 raises the tires so they don't rub and provide an easy place to screw down the wheel chock.

The eye bolts are to tie down the landing gear.
 It all worked well for our 15 mile trip to the airport.  George and Dave helped with the move and putting the wings back on.  Unfortunately I left the bag with the bolts for the upper wings at the house.  I'll get them installed and everything safetied.

Looking Good!


Monday, April 22, 2019

Airplane On The Trailer


 I bolted the deck boards to the frame with 4 galvanized carriage bolts (1/4") for each board.

The treated bottom board for the tail wheel track is bolted to the frame in the same way.

I split another board to make the side rails.  The angle at start of the track side is more so I don't rip on the ends so easily.  There were 2 studs at the front where the winch was attached.  I used them to bolt down the front end of the track.


 I pre-drilled holes for the side rail screws from the top down, so they would be in the center of the rail boards.  Deck screws were used to screw the side rails to the bottom board.  I used 2" screws about every foot.

I need to put the plane on the trailer to work out stops and tie-downs.


 I got some ramps at Tractor supply, on sale.  I think they're a little short.  I would have liked a shallower angle.

I used the come-along to pull the plane up the ramps.  I think the winch might be hard to control going down.

 I knew the fenders would get in the way of the axle ends.  I've marked the fenders to cut some notches.  The plane will sit about a foot further back towards the van when I'm done.  I still like the fenders.

Sunday, April 21, 2019

Rudder Stops Installed, New Upper wing Fittings & Upper Wing Hand Holds

I discovered a small problem when I installed the tail surfaces so I could locate the Nicopress stop on the cable.  My Nicopress tool won't squeeze the round stops, I thought it could.  I had to redo the cables with regular oval Nicopress sleeves.  They're designed to squeeze around 2 pieces of cable so you need a short piece of cable, about 2" to properly squeeze them as a stop.  I carefully cut 2 pieces of cable with the Dremel tool cut off wheel.  They worked fine.
 You need to position the short piece of cable so it doesn't stick out past the end of the sleeve where it hits the wooding block.  You want the sleeve hitting the block not the end of the cable.  This all would have been easier before installing the gas tank and center section so you can undo the cable from the rudder and rudder pedal to squeeze the sleeve.  The Nicopress tool handles open too wide to use inside the fuselage.  Fortunately I had an old manual tool from my hang gliding days.  It was awkward but it worked.

The plans call for a 1" gap at the trailing edge of the Elevator when the pedal is pushed to the stop.

The other problem I ran into was the lack of a hand hold on the upper wing center section.  Once I had the wings on I decide to sit in the cockpit for a picture.  My foot snagged on the edge of the cockpit getting in.  I lost my balance and landed on the ground on my injured hip, major pain, and cracked a rib, more pain.  I had removed the old machine gun mounting system without realizing I had used it as a hand hold to stabilize myself getting in and out of the cockpit.  I hold onto the cabane strut with my right hand but I'm tall enough I can't reach the other strut under the wing with my left hand.  The hand grabbed wildly for something on top of the wing which was no longer there.  Even if the gun was installed with the new mount there would have been nothing to hold.

 Before installing the hand holds I removed the wings and moved them to the airport.  With the wings off I could see the Upper Wing Attach Fittings were bent at the center hole.  I decided to remake them from 0.125" steel instead of the 0.095" on the plans.  The bending had to do with a slight compression of the wood on the center section due to tightening the bolts.  This made the fittings closer together on the center section.  When the wing panels were installed the outboard ends of the fittings bent up slightly.  It didn't seem like much with the wings on but looked much worse with them off.  I've put some washers under the fittings to shim them up to prevent the bending and feel safer with the thicker steel.  Only the top fittings seem to have bent.

The 2 small fittings on the left are for attaching the hand hold to the inboard bolt on the wing fittings.  I carefully marked the wing fittings and duplicated the hole locations so the wing bolts should all line up properly when reinstalled.

 The hand holds are made from painted door handles, big enough to fit my hand.  One end is bolted to the fitting which attaches to the wing with the fitting bolt and the other end is screwed to the trailing edge wood.  I used 2 #8 stainless steel wood screws 1 1/2" long.  There are some washers under the handle to screw holes to carry the loads to the wood and the fitting rather than the edges of the handle ends.


 There is room under the fitting for the bolt heads because the fitting sets on top of the wing attach fitting.  They shouldn't press into the fabric since you pull up on the handle in use.

OK the are a little odd looking but they work.  I don't need them pulling myself up out of the cockpit.  The cabane struts work fine for that.  They're just for stability getting your feet in and out of the cockpit.