Sunday, June 4, 2017
Brace Cable Length Fixture
Having figured out how to make the wire wrapped cable ends the way I wanted, I needed a way to make sure the cable length was correct. Wrapping and soldering the ends was too much work to remake one because I messed up the cable length. When we assembled the plane the first time we did it in the barn, and just made each cable to fit the plane with the wings held in position. When I started this it was fall and I didn't want to leave the plane assembled in the driveway for weeks. I also wanted to recover the wings while I made new cables.
To control the length I made a simple fixture from 2x4s and some pieces of angle iron. The block and angle bracket on one end is screwed to the 2x4. The other end can be positioned to the desired length of the cable and just clamped to the 2x4 frame.
I assembled the plane and rigged all the cables tight.
I measured each cable length from the edge of the fitting, at one end,to the center of the pin, on the far end of the turnbuckle, at the the other end.
The fixture is set up to duplicate cables using the distance between these same references, the edge of the fitting and the pin at the far end of the turnbuckle.
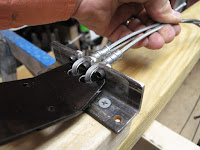
I made a bracket at the fixed end to hold the fitting. It's screwed to a piece of 2x4 which is screwed to the 2x4 base.
I found I needed to protect the fitting paint from scratching so I made a protector from a plastic blister pack. It had a nice fitting square corner.
The 3 holes are for socket head cap screws which keep the fitting from sliding off the end of the bracket, which it did without them.
My length measurement starts from the fitting side of the bracket. If I had been thinking, I would have positioned the angle bracket on the block so the fitting side of the angle was in line with the edge of the block
I took all my measurements in centimeters because it was easier.
The movable block was made so the measurement between the edge of it and the edge of the fixed block is exactly the length of the cable. As a result all I have to do was measure from the fixed block, draw a line for the front of the movable block and clamp the movable block on that line.
The bracket on the movable block has eye bolts for the turnbuckle pins. Since all my wing brace cables are double I used 2 eye bolts. In the end I did each cable as a separate piece so I could have done this with 1 eye bolt.
One advantage I found to 2 turnbuckles was the ability to easily lock the turnbuckle barrel so it wouldn't unscrew while working.
I crimped the Nicopress sleeve on the free end of the cable but did not wire wrap it until cutting the cable to length. You can't spin the cable while it's still attached to the reel of cable.
With the length set and the turnbuckle at zero threads showing, I pulled the cable snug, then cut it off about 8" past the fitting end bracket.
The turnbuckle end was then wire wrapped and soldered.
I found a couple nails and a safety pin made simple stops to keep the cable end from turning in the barrel.
Slip the Nicopress sleeve on the cable, pull the free end of the cable around the thimble on the wing fitting, then back through sleeve.
To grip the free end of the cable, so I could pull it tight, I modified a cheap pair of Vise Grip type pliers. I used a chain saw file to make a groove to fit the 1/8" cable. I felt it gripped better than flattening the cable end in the jaws. The groove needs to be such that there is a slight gap when the jaws are tight.
This works really well.
I removed the adjustment screw on the pliers and installed a 5/16" eye bolt so I could use a ratchet strap to pull the cable tight. The cheap pliers had a metric bolt with threads very close to 5/16 UNC. I just ran a tap down the threads to clean them enough for the eye bolt to turn freely.
The ratchet strap works well to pull the cable tight. To keep the 2x4 from bending I screwed another 2x4 to the bottom, forming a "T" section.
I also added some 2x4 feet so I can clamp it to saw horses at a convenient working height.
With the cable tight the Nicopress Sleeve is positioned with a 1/16" gap to the thimble, as on the other end, and squeezed. I had to take the cable out of the fixture to make the squeeze closest to the fitting. If you don't you just can't see what you are doing to position jaws.
My original idea was to leave the first cable in position while crimping the second cable. With very little thinking I would have realized the 2 cables were too close together to squeeze the second cable with the first one tight.
Tip it back out of the way and do the second cable. You still need 2 slots in this bracket for everything to fit.
The cable is then ready to finish wire wrapping the ends as discussed in the previous posting.
Subscribe to:
Post Comments (Atom)


No comments:
Post a Comment