Check it out at the EAA video library. If the link doesn't work here is the URL:
http://www.eaavideo.org/video.aspx?v=1526595994001
If you would like to just look at the slides here they are. You can click on a picture to see a larger image.
I've put the text of my script for this after each picture. Doing a webinar looks easy but it took about 100 hours to put it together and then you can't see your audience while your speaking, very weird.

1 - Building a Fly Baby (0:30)
-
Welcome and thank you for taking the
time to be with us to talk about this cool little plane called Fly Baby.
-
Building a plane is one of the most fun
and rewarding things a person can do in life.
-
Fortunately,
o
Fly Baby is one of the easiest planes out
there to build.
-
It’s also a lot of fun to fly.
o
It’s a tail dragger but it doesn’t take
any great skill,
o
the view is great,
o
and people come out to look at it where
ever you land.
-
From the smile on Pete’s face I’d say
he’s definitely having fun.
-
By the time were done I hope you will
see both
o
The joy of building a Fly Baby, and
o
That it’s probably within your abilities
to build
§ no
matter how limited you think those abilities are right now.
(00:30)

2 - N4284C (2:00)
-
I’ve been hooked on Fly Baby since I
helped with my father build ours back in the mid- 60s.
-
We built it as a monoplane, with a 65
horse Continental in it.
-
In 1976 my dad converted it to a
bi-plane.
o
The plane is licensed so that you can
switch back and forth between the monoplane wings and the bi-plane wings with
just a log book entry.
o
Other than the upper wing blocking some
of your view there’s not much difference.
-
The engine was upgraded from 65 to 85
HP, but still
o
with no starter, generator or any of
that heavy stuff .
o
The climb is better for not much more
fuel
o
The C-85-8 is a good engine for a Fly
Baby
-
It took us about 2 ½ years to build and $1,750
dollars
o
That sounds like a vote for the good old
days but today that’s the equivalent of just under $13,000.
o
You probably can’t quite do it for that
today but we were able to buy a lot of hardware at surplus stores, the A&N
store and places like that.
o
The spruce lumber and 1/8” fir plywood came
from the local lumber yards
o
It’s still a plane that can be built for
around $15,000
-
It took 1,700 hours to build, which
sounds like a lot but that’s 2 hour a day over that time period.
-
(02:30)

3 - Our Skills & Background (1:10)
-
When we started building the plane
neither of us really knew much of anything about building airplanes.
o
We had built model airplanes, but hadn’t
worked on REAL airplanes
o
My Dad had done remodeling on our homes
o
He had worked on a farm as a kid
o
and he had the general mechanical sort
of skills that a person had back then from working on their cars,
§ tuning
them up regularly
§ and
keeping things running.
-
Neither of us were pilots
o
Dad had taken some lessons on the GI
Bill
o
I had been for a couple airplane rides, but
no instruction at that point.
o
I was in high school
§ I
didn’t have any skills beyond metal shop, wood shop and drafting
§ I
had built a lot of balsa model airplanes.
§ Fly
Baby is just a big stick built model
-
Despite our limited skills the plane
came out great
-
40 some years later as an Engineer and A
& P Mechanic I have a little
different perspective
o
And, OK I could probably build one
faster today and it would be a work of art
§ But
it wouldn’t fly any better
-
(03:40)

4 - Why Build (2:30)
-
We decided to build the Fly-Baby because
it’s a cheap and easy plane to build.
-
You can store it at home, potentially,
although we never did.
o
With today’s cost of hangar rent I would
like to go back to storing the plane at home and trailering it to the airport
o
Right now I’m working on it in my attic,
but I will get it back to the airport.
-
You
don’t need a lot of complicated skills to build this plane.
o
You need to be able to do some basic
drafting to lay out parts
§ a
pencil, scale, and straight edge so you can cut them out
o
There are wood and metal parts to be
sawed and drilled,
o
Assembling parts requires the use of
basic hand tools like hammers, screw drivers & wrenches.
o
most of the work is simple tasks easily
accomplished.
-
The EAA is a huge resource for helping you
learn about anything from
o
Simple things like assembling a brake
line
o
to more complex things like fabric
covering.
o
Chapter members are a great resource, as
well as on-line tips and workshops
§ At
Oshkosh
§ An
through Sport Air Workshops
-
There is also a lot of information at
the Fly-Baby web site.
-
I think the biggest help with this plane
is that it just has a great builder’s manual.
-
Before we get on with building the plane
let’s talk a little more about flying a Fly Baby
o
The plane is a lot fun to fly, whether
you build one or buy one.
-
It’s open cockpit .
o
The view is better with the monoplane
than the biplane.
o
The top wing blocks some your view.
-
There is hardly any difference between
flying the Monoplane version or the Biplane version.
o
The stick forces are not much different
from other light planes
-
I fly off grass and pavement and would
only use Cub wheels
o
It’s the only shock absorption
-
A Fly Baby is always a crowd pleaser
o
It’s just unique enough to get people to
look and ask questions
-
My dad and I are both over 6 ft tall
o
It was important to us to build a plane we
could fit into comfortably
o
A lot of the planes out there, Pitts
Special, Smith Mini-planes and others that were designed for smaller pilots
-
How easy is this plane to fly?
o
It is a tail dragger with a narrow gear,
but
o
We’ve had over 15 pilots fly this
airplane over the years.
o
Fly baby was the first plane I flew
after getting my private check ride in a Cessna150.
§ I
had 60 hours of flight time about 10 hours of it in a tail-dragger,
§ but
that was a year before I flew the Fly-baby.
§ I
had no trouble flying thing it.
·
I’m not a natural pilot
·
My first instructor gave up after 2
hours and said it was simply beyond my abilities
-
(06:10)

5 – Builders Manual (1:30)
-
Back to the builder’s manual
-
With some planes you get a stack of blue
prints and not a clue what to do.
-
The Fly Baby builder’s manual is just a
simple set of step by step instructions,
o
just do this, do that,
o
check them off and move on to the next task.
-
Each section starts with a list of what materials
you need.
o
How to cut all the different sticks you
need,
§ what
size they are,
§ how
long they are,
o
An explanation of where those pieces are
used.
o
The hardware list is such that you can go
sit down and order the stuff.
-
Obviously you can buy all of the wood as
pre cut sticks of spruce
o
We bought boards of spruce and cut all
the pieces ourselves.
o
We bought all the wood from our local
lumber yard, except for the wing spars.
-
The drawings range from drawings that
are typical engineering sort of drawings
o
where you have a view and dimensions on
it
o
to perspective or isometric
drawings.
§ These
show you how things fit together
§ and
how to do things, such as how to hold parts in place while you’re doing the
work.
-
Pete worked hard to include the information
you need to cut out the parts as well has how to put them together.
o
This makes this a pretty easy process
for building this airplane.
-
(07:40)

6 - Builder vs Flyer (1:30)
-
Something to think about in terms of
building a plane is are you really committed, is this something you really want
to do.
-
If your mission is strictly to go flying
the airplane then this isn’t best the means to that end.
o
You can generally do as well just go out
and buy a plane
o
There are Fly-Baby’s for sale from time
to time.
o
There are a lot of other planes in
similar performance and price range.
o
Small homebuilts like this are typically
only worth the value of the engine, wheels, instruments and propeller
§ The
rest of it has no value.
§ I
see Fly Babies listed in the $5,000 - 10,000 range.
§ Even
if you need to recover the plane for $2,000 – 3,000 it’s still a good deal
-
If you like making things, fixing
things, and working on stuff
o
If you like the pride you get from
finishing projects and each little task along the way
§ then
building a project can a lot of fun.
-
People are always wanting to know, will
this thing be done soon (You know ARE WE
THERE YET?)
-
I like to remind people
o
the fun is in the doing and not just in
being done.
-
The truth is, that if you are having fun
o
does it really matter
§ if
that fun is flying an airplane
§ or
building an airplane.
-
If you’re having fun what more could you
ask for.
-
Building A Fly Baby is FUN!
-
(09:10)

7 – Building Considerations (2:00)
-
Building any plane is no small task
o
Fortunately getting it done is the
result of a lot of small tasks
o
Like eating an Elephant one bite at a
time , but
§ A
Lot More Fun!
-
We finished our plane in 2 ½ years with
a total of 1,700 man hours
o
That sounds like a lot of hours but it’s
2 hours a day
-
Finishing is ALL about doing some actual
small task every day
o
even if you just drill one hole,
o
Install one bolt,
o
Glue a Joint
o
Do Something Every Day!
-
The time and money for all this still
have to come from
o
Family Time and
o
The Family Budget
-
The good news is they can always get you
airplane parts for gifts on those special days
-
I do most of my work in my attic
o
Yes there is a plane in my attic and
o
yes it will come back out the same 42”
door it went in
§ Of
course no visitor actually believes that.
o
The nice thing is I can be up there
working any time I have a free moment
§ The
grand kids think it’s great to help Grandpa with the airplanes
§ Rowan
has asked if I’m going to build a plane for her and for Duncan, we’ll get there
sweety!
o
My wife has a thing about doing smelly
work or welding in the house, so
§ I
use a tent in the driveway for dope and fabric work and welding
§ When
all my airplane projects are done I’m going to build a garage to replace the
tent
§ I
want to go back to trailering the Fly Baby to the airport
-
I know people who are and have built
their planes at the airport, despite the cost and travel time,
o
But it just takes more planning than I’m
capable of
§ The
people work at the airport successfully seem to be retired people with time on
their hands
o
The other thing I’ve found when working
on the Fly Baby and the Cabin Waco at the Airport is
§ There
are always people who think asking questions is somehow helping get things done
(11:10)

8 – Tools (3:00)
-
For you do-it-yourselfers this is your
chance to get some more tools.
-
It doesn’t take a lot of tools to build
this airplane.
o
The tools needed are not complicated
o
Even if you’re not comfortable with
tools
§ None
of the parts are so expensive you can’t re-make a few as you learn
-
There are small parts that have to be
welded,
o
But generally you can find someone in
the local EAA chapter or a mechanic that can do the welding for you
-
Most of the work that has to be done is
really the woodwork and making steel fittings (lots of them)
o
Therefore a good table and band saw make
this work go a whole lot faster and easier.
o
I Wouldn’t want to build a Fly Baby
without these two tools.
§ A
jig saw would work for cutting out some
of the wood parts,
§ A
band saw cuts faster especially on thicker parts
§ A
band saw can also be used to cut steel parts if you slow the speed down enough.
·
Our neighbor loaned us his band saw,
which we used.
·
For cutting steel we modified his saw
with some old washing machine pulleys.
·
You need to have the blade going really
slow to cut steel, < 300 fpm
-
You do need a small drill press for
drilling the holes mostly in the steel fittings.
o
Most of the holes that are drilled in
the assembled parts can be done with a hand drill.
-
A belt sander is a very useful tool for
helping to finish the edges of parts and to quickly finish shaping band sawed
parts.
-
We borrowed my uncles old ShopSmith, one
of the very first ones made, mostly to use as a table saw for all the spruce
sticks
o
The basic ShopSmith is one of those
great tools, table saw, disk sander drill press and wood lathe all in one.
o
The ShopSmith is a wood working tool
with a ton of accessories
§ I
use the belt sander and wood cutting band saw the most.
o
In the early 80’s my father got a nice
new ShopSmith with everything.
o
I have it now and use it almost every
day. He has no hope of getting it back,
I use it too much.
-
When it comes to hand tools, you don’t
need too many.
o
A hand drill,
o
tack hammer,
o
a little brad nailer
§ For
$5 this has been the best thing for the thousands of nails used to hold parts
while the glue dries
o
A
small exacto saw works great for cutting small sticks to fit right where you’re
working.
§ You
do not have to get up and go to the saw to do something.
o
You need some wrenches to bolt things
together
§ There
aren’t many sizes that are used on this or most small airplanes.
o
Some tin snips are needed when you are
doing the sheet metal work for the cowling and leading edges.
o
A Whitney punch is a great little tool,
worth having for punching the holes in thin steel parts.
o
You will need a lot of C clamps for
clamping up the laminated bows on the wings and tail
o
You also need a couple pipe clamps to hold
pieces together while you’re assembling the fuselage.
-
(14:10)

9 - What to Build First (1:50)
-
One of the things to think about is where
do I start this thing?
-
What am I going to do first?
o
A lot of kits today start by having you
built an aileron or an elevator or something like that.
o
The manual for the Fly-Baby has you
start with the fuselage.
§ Build
the fuselage, then the tail surfaces, the landing gear, build the wings, put
the engine on, go fly the thing.
o
That all makes good logical sense and you
kind of work your way through the plane.
o
You can sit in the fuselage and make
airplane noises and dream about those days when you will be flying this
thing.
-
The reality is the fuselage takes up a
lot of space and it’s is your way the whole time you’re working on everything
else.
o
I think our tires got more use moving
the plane than flying
-
Today the way that I work on stuff is
that I start on the wings and tail surfaces.
-
When those are done I work on the
fuselage.
o
You can strap wings to the ceilings, of
an attic or work area.
o
The same with tail surfaces, they can be
hung on the wall.
o
There is no way to get that fuselage out
of your way,
§ unless
you have a large shop.
-
But there is a problem if you don’t
start with the fuselage,
o
it
doesn’t look like your building an airplane for quite awhile
o
Anyone can look at a fuselage and see
you’re building an airplane
o
You can look at it and keep your spirits
up while you do the remaining 95% of the work.
o
I’m not sure I can look at an elevator
and imagine the rest of the airplane.
-
You need the space of a one car garage
to park the fuselage
o
If that’s all the space you have start
with the smaller parts
o
Plus if you build the tail surfaces
first and decide that this isn’t for you
o
or if you make a mess of your first
parts,
§ you
have a reality cheap part to throw away
-
For the rest of this discussion we’re
going to follow the order of the Builders Manual because that’s what we did.
-
(16:00)

10 – Fuselage Sides (0:50)
-
OK let’s cut some wood.
-
The fuselage is simple it’s like
building a big stick built wooden model airplane.
o
You’ve got pieces of wood that you hold
down, over a drawing of the fuselage side on a plywood table.
o
You draw the fuselage side on a plywood
table
§ And
cover it with waxed paper so the glue won’t stick to the table
§ Blocks
are positioned as shown in the drawing to hold the sticks in place
·
Like using pins building a model
airplane
·
This drawing is just the front half of the
fuselage, the page covers the back half
§ The
sticks are cut to fit
§ And
1/8” plywood is glued and nailed to the top of the sticks
·
The glue is brushed on both the sticks
and the plywood
·
Nails are placed about every ¾” -1”
·
so you need to move right along once you
start
§ Once
you’re done you’ve got the 2 sides of the fuselage.
-
Let’s talk about Glue
o
I know there are people who love their
favorite epoxy glue
§ I
only use Resorcinol
§ It’s
safe, It’s waterproof, It’s the only FAA approved glue
-
(16:50)

11 – Fuselage Cross Members (1:50)
-
You take those two sides and stand them
up on the top edge to install the cross members
o
From the firewall to the back of the
cockpit the sides are parallel,
§ behind
the cockpit the side get pulled in to a point at the tail.
o
Start with the cockpit where everything
is nice and square
§ You
use some sticks of cheap 1x3 with notches cut into them to hold the sides
parallel.
§ A
carpenter’s square is used to make sure that the sides are also square to each
other.
-
Once everything is squared up you start
installing all the crosspieces to tie the sides together.
o
This is where the pipe clamps are
used to hold the sides snug to the cross
members while gluing and nailing
o
There are pieces of plywood (gussets)
which tie the cross sticks to the side sticks
o
Glue on the end of a stick adds no
strength
-
The tail is tied together with the spar
for the fin,
o
Which also acts as a rollover structure
-
As with anything new you are building or
doing,
o
Most big mistakes can be prevented by being
willing to stop
o
if something doesn’t seem right
o
figure out why and make it right.
-
The fuselage probably takes the most
amount of space to build.
o
The table that is 3 foot wide and 16
long
o
You also need 3-4 feet of space on each
side to be able to get around it and work.
o
We did this in our basement, so there
was plenty of room.
o
We just carried it up the steps and straight out the door when the
fuselage was done.
-
(18:40)

12 - Fuselage Sheet Metal (1:00)
-
There is some sheet metal on this
fuselage.
o
The area around the cockpit,
o
The engine firewall and cowling,
o
things like that are done with sheet
metal.
-
Pictured here is the baggage compartment
and head rest
o
In this case there is a wood frame which
forms the space of the cowling around the cockpit
o
The sheet metal is then screwed on to the
frame with wood screws.
o
The aluminum we used here looks white in
the picture because it is white,
§ it
is aluminum which was used for the outside of trailers, without ribs formed
into it.
§ It’s
pre-painted, wrapped around here and screwed on.
-
Again nothing complicated
-
(19:40)

13 - Landing Gear Woodwork (1:30)
-
The landing gear for this plane is
pretty simple.
-
The main landing gear is made of some laminated
pieces of wood,
o
in our case, we used Douglas Fir.
o
They are ¼” thick pieces of fir.
-
By gluing the boards so they crisscross
in this area you get some very strong gear legs.
-
The biggest trick making these to have
everything ready when you start gluing.
-
It’s a little hard to see in this
picture, but
o
there are some pieces of wood that you
have to use to clamp to in the middle of the stacks of boards.
o
You need good pressure is in the middle
where the actual gear legs are cut out
o
If you don’t clamp the middle the boards
will tend to bow out
§ Causing
the middle to not glue securely.
-
Once the glue in the laminated stack is
cured,
o
you use the band saw to cut out the
actual “vee”.
o
The edges are rounded with a wood rasp
and sand paper
§ To
give it a more streamlined shape.
-
Let’s go back to the C-clamps needed for
doing this
o
you need clamps that will reach in 3-4
inches
o
and will open up to be 3-4 wide to fit
over the boards used to distribute the pressure over the Glue joints.
§ Always
use a block of wood under a clamp so you don’t leave dents in the wood
-
(21:10)

14 - Landing Gear Metal Work (2:30)
-
Along with the two main wooden legs
there are a whole bunch of little steel fittings which hold all this together.
o
There are fittings at the top of each end
of the gear legs
o
Fittings on and in the fuselage to
attach the gear legs and
o
Fittings at the bottom of the leg.
-
The way this plane goes together is, all
the structure is made out of wood,
o
but all the structural assemblies are held
together with steel fittings that are bolted on.
o
Most of them are pretty straight forward
to make.
o
There is a lot of time spent with a
metal cutting band saw,
§ slowly
cutting all the metal parts,
§ Then
drilling holes in them,
§ Filing
the edges to smooth them up to prevent cracks from starting along a rough sawn
edge
·
As a general rule when making fittings
for airplanes always avoid sharp corners
o
Sharp inside corners lead to cracks
o
Sharp outside corners can add no
strength
§ just
extra weight
§ The
last step is to prime the fittings with some Zinc Chromate or epoxy primer and
then paint them.
-
One thing that I have learned over time
with steel parts is to always paint over the primer
o
I’ve seen a lot of parts, many from factories,
§ where all they did was put on some Zinc
Chromate Primer.
§ The
steel eventually rusts.
-
The axle gets assembled by bolting these
fittings to the legs
o
the hole for the axle is drilled with a
hole saw
o
Then the axle is welded to the inboard
fittings
o
The way we cut these holes was with the
ShopSmith set up as a drill press
-
I would Gas Weld all the joints on the
landing gear.
o
There is no shock absorption and the
gear gets jarred by every bump, this is no place to risk a brittle weld.
-
(23:40)

15 - Tail Surface Woodwork (2:00)
-
The tail surfaces are fairly simple
construction
o
The ribs are a piece of 1/8” plywood
with two 1/4” square sticks glued on the bottom.
§ You
can see it forms a kind of “C” shaped section when it’s done.
o
The nose ribs are simple pieces are ¼”
plywood band sawed to shape.
o
The leading edge is a stick of spruce.
-
The trailing edges on the elevators and rudder are laminated from strips of
wood.
o
You start by drawing the shape on the
work table
§ Lay
down wax paper to keep this mess of glue and wood from sticking the table
§ Drive
nails into the table forming the shape of the bow.
o
Glue is brushed onto both sides of each
stick,
§ while
making a stack of the laminations
o
A clamp is placed on one end of this
stack to hold it together.
§ The
stack is laid down on the table.
§ Each
strip is pulled into position and a nail placed at the end to hold it until all
strips are in position
§ Now
you need a pile of 3” clamps
§ Starting
from the first clamp the stack is clamped tight to this curve.
o
When you’re done you’ve got this curved
shape
§ When
the glue is cured it’s ready to cut and fit to the ribs and spar.
§ Once
the whole assembly is together you have to shape it down to the streamline
shape of the trailing edge.
-
The spars for the tail surfaces are
similar to the ribs except that they have a piece of plywood on both sides,
o
This means you need to carefully varnish
inside the spars before you put the plywood on the second side.
o
In the days when the FAA inspected this
stuff they came out and inspected it before you closed up these hidden areas
§ they
wanted see that you actually had varnish inside of there, and
§ that
you didn’t have varnish where the glue was going to go.
-
Today you are working with a fellow EAA
member who is a designated person who can check your work.
o
It’s a lot easier to keep a project
moving today
o
But the Feds were always interested in
these projects
-
(25:40)

16 - Tail Surface Metal
Work (1:40)
-
There’s a variety of metal work on the
tail surfaces.
-
Between the ribs the leading edge shape
is formed with thin aluminum sheet nailed to the wood structure.
o
One thing we learned is that these
aluminum leading edges are real easily bashed up;
o
You
need a fairly stiff aluminum to help prevent dents.
o
What we had was a fairly soft flashing
sort of aluminum;
§ It was way too soft for this.
§ In
the end the aluminum got so beaten up it probably wasn’t of much value.
-
There are a variety of steel fittings
needed for the tail surfaces.
o
The tail surfaces are attached to the
fuselage with these “C” shaped metal fittings.
o
There are tabs for attaching the bracing
cables
o
Some more “C” shaped pieces are used to
make the hinges for between the two tail surfaces.
-
The elevators are operated by cables to
this control horn
o
It’s in the fuselage
o
This horn is bolted to the end of each
elevator with a support bracket inside the elevator
o
All these steel fittings need to be cut,
filed and drilled.
-
A metal cutting band saw, belt sander,
and a drill press are really important for getting all these done.
-
We used a vice and hammer to form all
the bends.
o
That works pretty good for most parts.
o
Today I would make a form block for the
“C” shaped parts
§ Clamp
the blank on the block with the vise and then hammer each end over the block.
§ Much
more consistent parts.
§ This
is one of those little tips which should be part of a video on “How To Build
Fly Baby”
-
(26:40)

17 - Wing Basic
Woodwork (1:50)
-
The wings are relatively simple, much
like building a model airplane.
-
You’ve got two wing spars.
-
You build up these ribs out of pieces of
plywood.
o
The nose is ¼” plywood
o
The center and aft webs are 1/8” Plywood
o
You put a cap strip on the bottom and
o
a cap strip on top
o
with a notch cut in them, so the plywood
webs sit down into that notch.
o
You glue and nail them together and when
the glue cures you have a rib.
-
We did have trouble with these cap
strips splitting because you’ve got this real thin section were the ribs sits
down into it.
o
That is where you are doing the nailing
o
So it is pretty easy for them to split as
your nailing to the webs.
§ Making these in a jig might work better but
it’s a lots slower while you let the glue dry
-
Once the ribs are made up though, it all
goes pretty quick.
o
The ribs slip on the spars
o
There is some steel bracing which goes
in before you glue
§ (We’ll
come back to it)
o
then you have some little corner blocks
which you glue and nail into each corner to attach the ribs to the spars.
-
The same corner blocks are used when you
are building up the wing walk.
o
Each little cross piece for the wing
walk has a little corner blocks to attach it to the ribs.
-
(28:30)

18 - Wing Tip Woodwork
(1:30)
-
The Aileron cut out is strengthened with
plywood and spruce sticks to
o
form a “C” section false spar to attach
the aileron.
-
Once you have the basic structure built you
have to build this laminated wing tip bow.
o
It’s like doing the tail surfaces but
bigger and done in space not on the table
-
In
this case we bought, some Redwood ( a nice straight grained wood which is easy
to work to shape).
o
We sawed out strips that were 1/8” thick
by 2 ½” wide from the Redwood and
o
laminated the wing tip bows out of
Redwood.
o
It worked really well. I recommend it
for this.
o
It was easy to bend to the shape and
easy to carve
o
They just came out looking good.
-
You attach the first strip and let the glue
cure.
-
Then come back and attach all the
remaining strips to it in one big lump of strips all glued up and clamped in
place.
-
This forms the bow,
o
you actually form it long enough to
create what is needed for the curved part of the aileron.
-
Once the glue has cured it gets carved
and sanded,
o
We used a spoke shave and wood rasps to
carve it down to make a nice smooth shape.
o
It looks really cool when it is all
finished down and blended to fit the shape of the wing tip, so nicely.
§ It’s
one of those fun sculpture sort of things to do.
-
(30:00)

19 - Wing Metal Work
(1:40)
-
The wings like all other assemblies are
attached to the fuselage with metal fittings here at the end of the spars.
o
These are the fittings we discussed
earlier which attach the landing gear.
-
There are some fittings up in the
fuselage, which attach the landing wires
o
The flying wires attach at the end of
the axel on the landing gear.
§ The
main reason this landing gear has no shock absorption is because the flying
wires are attached directly to the axle.
-
Along with the attachment fittings there
are Compression Ribs which run between the spars.
o
These are just lengths of tubing.
o
At the ends of the Compressions Ribs are
fittings for the Drag and Anti-Drag wires
o
The Compression Ribs and wires are what
keep the wings straight.
-
The Compression Ribs and wires have to
be installed before you
o
Glue the wings
o
Or build the wing walk.
-
The trailing edge is a piece of folded
aluminum
o
you can buy from any of the aircraft
supply houses
-
The leading edge is just like the tail
surfaces
o
only a little bigger.
-
(31:40)

20 – Ailerons (0:50)
-
After building the wings and tail
surfaces there is no magic to the ailerons they’re the same simple construction.
-
The spars are built up like the spars in
the tail surfaces where start with a piece of plywood,
o
some sticks glued on
o
all of it gets varnished inside and a
piece of plywood gets glued on top to make a nice box spar.
-
The ribs are the back end of the wing ribs,
o
They’re made the same as the regular
ribs with a plywood web
o
and cap strips on the top and bottom
-
The outboard half of the trailing edge
is made from a section cut off the wing tip bow
o
The bow is made long enough around the
trailing edge to leave a piece for this.
-
The portion of the trailing edge that is
straight is done with a piece of the same aluminum trailing edge material as
the wing.
-
(32:30)

21 - Varnishing (2:30)
-
Probably the slowest task of the whole
airplane was varnishing.
o
All of this wood has to be protected
with two coats of varnish.
o
I have a 1926 WACO. They did not put much if any varnish on the
wood in the wings.
§ If
the plane was parked outside the wood
behind the rear spar rotted within a couple of years
§ Today
we are smart enough to protect all wood with 2 coats of varnish.
o
One of the cool things today is Epoxy
varnish.
§ It
is great to be able to put it on the edges of cap strips, the sides of the
plywood fuselage and stuff.
§ We
had to leave those areas unvarnished because the solvents in the dope would
lift the spar varnish.
o
Today I use Regular Spar Varnish for
everything, except those areas were fabric is actually going to touch.
§ I
do those areas with Epoxy varnish, you
can even put it over Spar varnish to protect it
§ I
don’t use epoxy everywhere, it’s still an epoxy, and people can develop nasty
allergies to epoxy.
§ To
crawl inside the fuselage, varnishing all of those areas with epoxy, you really
need some sort of respirator
§ The
solvents in Spar varnish are easy to tolerate if you’re working indoors.
·
You can use a standard respirator with
carbon filters
§ I
like Valspar Marine Spar Varnish and Poly Fiber Epoxy Varnish.
-
(35:00)

22 - Rigging The Wings
(2:40)
-
Once the fuselage, wings and tails
surfaces are all built
o
everything has to get rigged to the
fuselage so it’s all square, true and in the proper positions.
-
You need a space big enough to assemble
the complete airplane,
o
We did it in the back yard
o
It sat there for a couple of days
because it takes a bit of time to get all of these cables on.
o
You have a fair number of cables to put
on this thing.
§ On
the top of each wing there are two cables to the front spar and two to the rear
spar.
§ The
same at the bottom
§ So
you’ve got a total of 8 cables for each wing.
-
The wings get fitted to the fuselage so
that you have the correct positive angle of incidence
-
Once the incidence is set you’ve got all
of the brace wires to create and properly adjust.
o
The landing wires keep the wings from
falling down
o
The flying wires keep the wings from
folding up
§ Collectively
they also control the dihedral angle
§ as well as to put any twist in it for the wash
in or wash out
§ Fly
Baby is rigged with 5 degrees of Dihedral and No Twist
o
It takes a couple of people doing it to
get all of this lined up.
-
You’ll need a Nicopress tool and go
no-go gauge to check you crimps
o
A lot of chapters have bought these for
their members to use so you don’t have to buy one
o
It’s not a tool you’re likely to have
much use for once the plane is done.
-
(37:40)
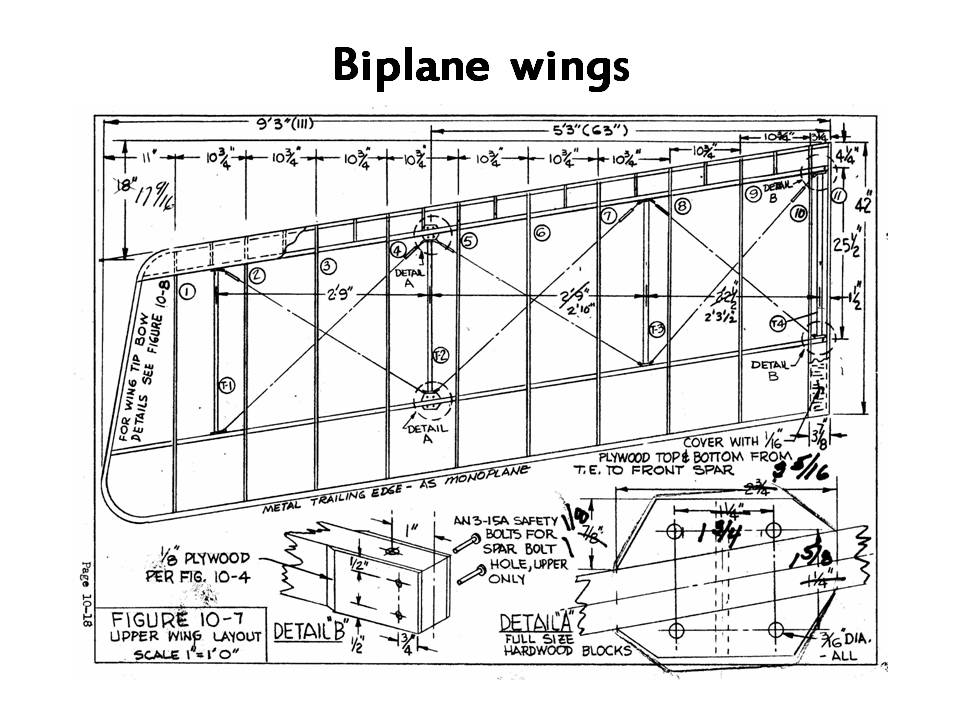
23 - Biplane Wings (1:00)
-
The Biplane is kind of cool looking and it
flies the same as the monoplane
o
so you can build either or both set of
wings
o
The biplane wings are built with 9
degrees of sweep back
o
So there is no change in how the plane balances
o
You can even license the plane to switch
back and forth between Biplane and Monoplane
-
The Biplane wings are built virtually
the same as the Monoplane wings.
o
The lower wings attach to the same bolt
holes
-
The upper wing has a center section to
build and
o
there are wing struts and cabane struts
to build
o
The struts are “N” shaped and
§ built
by the same method as the landing gear,
§ Laminated
from fir boards
-
There are also 4 wing panels instead of
2
-
The bigger issue is that everything is
at 9 degrees.
o
All of the parts get cut with 9 degree angles
on them
o
All the little blocks that go in here
all have to be cut with an angle so that they fit properly.
-
The wing tip bow, instead of being
laminated it’s simply a piece of tubing that is bent to shape.
-
(38:40)

24 - Flight Controls (1:30)
-
Light planes often have cable operated
controls.
o
On Fly Baby the rudder is operated by
cables from the pedals to the rudder.
o
I think we used Cub rudders pedals on
ours,
§ the
plans call for some homemade rudder pedals.
o
The elevator is also cable operated.
§ The
cables do not run all the way to the control stick
o
Because the wings fold the ailerons are operated
by push rods
§ all
the way from the stick to the ailerons.
§ When
the wings are folded you have to disconnect the ailerons
·
you
pull a pin to separate the push tube just outside the fuselage.
§ The
controls don’t need any re-rigging when the wings unfold
-
The control stick and torque tube are pieces of tubing with some
fittings welded on
o
The control stick is bolted to the torque tube
o
The stick pivots forward and aft on the
torque tube to operate the elevators.
o
The stick rolls the torque tube side to
side to operate the ailerons.
o
It’s actually a fairly simple system and
easy to make.
-
(40:10)

25 - Ready to Cover (0:50)
-
We finally have all of the structure
built
o
Everything rigged
o
All the controls are hooked up and
working
o
We are ready to put fabric on the
plane.
-
When this picture was taken we had
already done some of the fabric covering.
o
We put fabric on the fuselage and tail
before the wings were built because we were given some fabric to use.
o
It was fiberglass fabric, Razorback,
which we used to do a demonstration at a chapter meeting.
o
It made it harder to drill the holes in
the fuselage when
§ installing
the wings, but Free Is Free!
-
You can also see the aluminum leading
edge on the wing.
o
You can see how the curve of the
stabilizer leading edge is
§ Flatter
than the wing which is why it is so much easier to dent.
-
(41:00)

26 - Fabric Covering (2:10)
-
The fabric on the fuselage is done with
what is called the blanket method.
o
A piece of fabric wraps around the top,
a piece of fabric wraps around the bottom,
o
A couple inches of fabric are doped to sides
of the fuselage
o
Then a piece of fabric is doped to each
side creating an overlap with the top and bottom edges
-
The wings are done the same way with a
piece on the bottom and then a piece on the top
o
The overlaps are created on the bottom
of the aluminum leading edge
§ along
the trailing edge, the root rib and the wing tip
-
Once the fabric is on and tightened as
needed you’re ready to apply the dope or other sealer/finish
-
Most finishes require spraying some or
all of the coats so you need some place where you can safely spary
o
As you can see we did all of this in the
back yard
o
We used dope which dries so fast it
doesn’t stick to the neighbors cars, etc.
o
Some finishes dry so slowly you could
find yourself paying to repaint the neighbors car or your own
-
After the first couple coats are applied
you then have to rib stitch the wings and control surfaces
o
You use these long needles and cord to
stitch the fabric to the ribs so it doesn’t balloon in flight
o
The needle is passed through the wing
next to the rib
o
Back up the other side of the wing
o
And a not is tied to hold the fabric
securely to the rib
o
Move a couple inches and repeat.
-
With the rib stitching done there are 2”
wide cloth tapes, etc. to be applied over the ribs, stringers,
o
seams, and other areas where the fabric
needs extra protection
-
Then there is usually some messy wet
sanding involved.
o
Wet sanding over the grass in the summer
worked fine, the water just runs down into the grass and you get on with
it.
-
There are lots of fabric coatings which people
love, I‘ll take Poly Fiber any day.
§ It’s
light weight, fire proof, easy to apply and like dope it can be rejuvenated so
it will look good for years.
-
(43:10)

27 - Painting Colors
(1:20)
-
Once the fabric is on it is time to put
a paint job on it.
-
We chose to use the same layout as Pete
used on 500F.
o
We changed the colors to White with Blue
trim and
o
Red for the numbers and trim stripe.
-
We painted it with lacquer because we
could buy the lacquer real cheap compared to dope.
o
In the long run you are better off to
use dope over dope.
o
If you use Poly-Fiber finish it with
Poly-Tone.
§ Keep
it Cheap – Keep it Simple
-
We painted under the roof between the
house and garage
o
Dope and Lacquer dry fast enough that
you can paint outside
o
if it’s dry enough and the wind is calm
o
With other paints you will get dust in
the paint before it dries
o
And the overspray from slower drying
paints will get on everything.
-
There are some amazing Polyurethane
paints which give an awesome shinny finish
o
Forget them,
o
This is a Fly Baby it’s supposed to be
fun
-
(44:30)

28 - Engine & Cowling
(2:00)
-
The engine on this plane is a 4 cylinder
85 HP Continental,
o
which is without the starter, generator
and all that sort of stuff,
§ so
we’re talking hand propping.
o
As a result we have a glider tow hook on
the tail wheel spring
§ Tie
the tail rope to the glider hook
§ Chock
the wheels and tie the plane down.
§ Start
the engine, Untie it and remove the chocks
§ Once
you’re safely buckled up and ready to taxi
·
just pull the tow hook release and
you’re off
§ I
carry chocks and a piece of rope when flying just in case some airport doesn’t
have them.
-
The firewall is a metal firewall;
o
you have a firewall extension on the
sides of the fuselage which
§ It’s
to help protect the area from and engine fire.
o
You also have metal underneath which
serves a access
§ to
the brake pedals.
-
The fuel tank we originally installed
was a Cub tank.
o
We later built a Fiberglass tank that
was a little bit bigger so.
o
We eventually built an aluminum tank
that was about 18 gallons for even more capacity.
o
Today I’m building a new aluminum tank
that is down to about 14 gallons.
§ I
wanted more room for my big feet
-
It’s one of the beauties of a homebuilt
you can keep tinkering and playing with it
o
and have fun with it forever.
-
We didn’t use the simpler Cub cowl
because even then they weren’t cheap
o
A friend let us make a fiberglass nose
bowl from his mold.
o
The rest of it is just flat wraps of
aluminum sheet.
-
I still like the look and simplicity of
the Cub cowling.
(46:30)

29 - Trailering &
Wing Folding (1:40)
-
Our intent was to trailer the plane home
and store it in the garage to save money.
o
My Dad’s brother Bruce built up this
trailer for hauling the plane around on.
§ It
was a small trailer that got a long tongue added to it,
§ It
balanced out pretty good because of where the engine sat, so it towed just
fine.
o
We did use the trailer to take the plane
to some events,
§ The
plane was towed from Flint, Michigan to Rockford, Illinois.
§ It’s
been towed to the airport and various events.
§ Towing
Fly Baby does work
-
In order to tow it obviously you need to
fold the wings
o
The horizontal tail span was limited to
8 feet to allow it to be towed
o
The Biplane wings do not fold, it takes
about an hour to remove or install the biplane wings
o
The Monoplane wings, however, fold quite
easily,
o
You support the wing tips
o
Disconnect the aileron push tube
o
Loosen the big turnbuckle in the cockpit
§ for
the landing wires
o
You disconnect the brace wires with 4
clevis pins – 2 for the Flying wires at the axle, and
§ 2
for the landing wires in the cockpit
o
With everything disconnected,
§ pull
a wing straight out, there’s a pivot
tube with a stop,
o
then you rotate the trailing edge up and
swing the wing back.
o
There is a peg on the wing that fits
down into a hole in a block on the stabilizer.
-
The whole thing attaches together to go
merrily down the road.
-
If you were going a really short distance
you could potentially trailer it on the wheels of the airplane.
o
Since you have no shock absorption, you
would want to go very slow.
(48:10)

30 - Rockford Test
Flight (0:50)
-
Test flying a Homebuilt Airplane is one
of those stressful events
o
Best done by cool heads
o
In quiet locations
o
With plenty of planning with your EAA
Flight Advisor
o
Add a freshly overhauled engine with
worries of breaking it in properly, and
§ You
have a lot to deal with
o
A well proven airplane design can remove
a lot of that stress
-
We finished our plane in July of 1966.
-
Everything was done but the plane couldn’t
be flown until the FAA could schedule the final inspection.
o
That couldn’t happen until after the
Rockford Fly-in the end of July.
-
So the plane got towed to Rockford for
the fly-in,
o
Pete Bowers was there with his Fly Baby
– N500F
o
We managed to get our plane parked next
to Pete’s
-
Pete got to looking at our work and
decided there wasn’t anything wrong with our airplane
o
Pete felt it should be little more than
§ a
Production Test Flight
§ It
ought to be flown and he would be happy to do it.
o
He talked with Paul Pobernezy and the
FAA
§ They
all agreed the plane could be test flown there at the fly-in.
·
The FAA arrange to inspect it and issue
the Airworthiness Certificate
·
Harry Zeisloft looked out for EAA’s
interests in the inspection
§ It
was a beautiful day,
§ When
the Friday airshow ended, Pete took off and flew the airplane
·
With no problems,
·
Just happy smiles all around
-
If you want to read about Pete’s
adventures flying our airplane go back in Sport Aviation.
o
To the April of 1967 issue @ Oshkosh365
-
(49:00)

31 – Wrap Up (0:20)
-
Many thanks to all of you for letting me
rattle on for an hour.
-
Fly Baby really is a simple plane to
build
o
It’s relatively inexpensive to build and
operate, and
o
It’s fun to fly
-
OK, I’m a little biased
·
As a result of getting to work with my
dad building our Fly Baby
o
I got my Pilots Certificate
o
My A & P Certificate
o
A Degree in Aerospace Engineering
§ Harry
Zeisloft was even my first boss at AC Spark Plug
o
I’ve owned a Cabin Waco for several
years
§ And
gotten to fly a lot of cool planes
o
I have 3 Current airplane projects for
the Grand kids to help me with
§ And
a list of more to build
-
Would I build another Fly Baby
o
You Bet’cha!
-
(49:20)

