Showing posts with label Covering. Show all posts

Friday, May 12, 2017

Wings Sanded - Last Coat of Poly Spray


 The last wing was sanded and a final coat of Poly-Spray applied to everything.

You can see the generally light sanding in this picture.  There are no big bear spots after sanding.
 All you are doing is knocking down the high spots from dust, etc.

The edges of the tapes get sanded just enough to remove any sharp edge along the pinking.  I didn't sand along the cap strips so I wouldn't accidentally sand through the tapes at the rib stitching.  You could carefully sand between the stitching, I didn't.

I'm ready to start painting colors when we get some more dry weather.

Tuesday, May 2, 2017

Second Coat of Poly-Spray Complete

We've had some soggy weather which was good for wet sanding all the surfaces which had 2 coats of Poly-Spray.  I used 400 grit paper and just sanded enough to remove any dust, etc.  I didn't think they were very rough but after sanding they are so much smoother.  It was well worth the effort and time.

Today was warm and dry so I was able to get the second coat of Poly-Spray on the last wing panel.  when we get some more dry weather I'll be ready to put more Poly-Spray, to replace what I sanded off.  After that I'll have to start on the colors.  I have the Poly-Tone for the lower surfaces.  I need to order the clear to mix the colors for the upper surfaces.

Tuesday, April 11, 2017

First Coat of Poly Spray

Today I finished the first coat of Poly-Spray on all the surfaces.  The ailerons received their second coat so they are ready for a light sanding, then another coat of Poly-Spray.

I need to order the color for the finish coats.

Monday, April 10, 2017

Poly Spray on Ailerons


The nice weather looks like it will hold for a few days.  I've got the first coat of Poly-Spray on the ailerons, center section and one wing panel.  It always amazes me as you go from bare frames to covering, and then from covered to silver, just how different, and more like airplane parts, everything looks.  Very Cool!

Sunday, April 9, 2017

Started Spraying Wings


 We finally got some warm dry weather.  The first spray coats are done with Poly-Brush.  All the wing panel and ailerons are done so I can move on to Poly-Spray (silver).
I had to replace the paint cup on my HVLP gun because the old one cracked.  It's a plastic cup molded around a steel mounting nut.  As the plastic dries out, over time, it shrinks around the nut until it the plastic cracks.  I a cup at Lowe's which fits, but the anti-spill plug in the cap works differently.  It took me a while to realize I needed to remove the plug to vent the cup.  I would start spraying and it worked fine for a while and then the paint flow slowed to a mist.  I would stop to see what was wrong and when I started up again it worked fine until it sucked the air from the cup.  The old one had a valve which you opened to paint and closed to prevent spills.  This one you have to remove the plug, a sure plan to loose the plug.

Saturday, February 25, 2017

Wings Finished Through Poly-Brush


 We've had an amazing week in mid February, warm, dry, sunny days with light to no wind.  I've been able to get a coat of Poly-Brush on all the tapes.  The last tapes also had the pinked edges smoothed with the small iron at 225 degrees.

All the wings then received a final coat of Poly-Brush.  Today I was able to get the last coat of Poly-Brush on the bottom of the last wing.  Everything is ready to start spraying Poly-Spray (silver).  Next week is forecast to be warm also.  If it stays dry I'll get started spraying.  There is hope of getting this back in the air soon.

Sunday, February 19, 2017

Wing Tapes Done

It was a beautiful day today.  I finished pruning the fruit trees in the morning and then spent the rest of the day working on the last tapes on the wings.

 The aileron push rods on the lower wings have simple metal covers screwed to the wing.  The screw plates were made form .025" aluminum and glued to the fabric with Poly-Tak cement.  I covered them with 2" tapes.
 For the sharp curves on the wing tips I needed some 3" bias cut tapes.  Because they are cut on the bias, 45 degrees to the warp and weft, they stretch when you pull on them so that they fit tight around a curve.

I have a large cutting board with a nice bias cut line.  I used my 1 meter straight edge and Fiskars pinking cutter to make the strips of tape.  The straight edge is, conveniently, 3" wide.
 On the upper wings I started with the aft corner.  I stuck it to a straight section of the tip tube with Poly-Brush and let it dry so I could pull it tight to fit the curve.  I started where I did because it's easier to clamp it to the trailing edge while the rest of it dries after pulling it.
 While the aft corner dries I used a piece of regular 3" tape to cover the straight section of the tube.  I could have heat formed the tape to a smooth fit on the lower surface but it's quicker and easier to snip it about every 3" with the pinking shears.  I'm after a WWI look not an Oshkosh award winner.
 Once the center tape dried the forward corner was done with 3" bias tape.  I started on the tip tube again, let it dry, and the pulled it around the leading edge.   One disadvantage of bias tapes is that when you pull them to fit the curve they get narrower, oh well.
All the tapes and patches are on.  The next task is to glue on all the drain grommets.  After that some more Poly-Brush and then they'll be ready for Poly-Spray.  The aluminum powder in the Poly-Spray blocks the sun's ultra-violet ray to protect the fabric.

They really look like wings and the next several days are forecast to be perfect to keep working.

Friday, February 17, 2017

Spanwise Tapes On 2 Wings


 We had a beautiful day today so I was able to get the spanwise tapes on the lower right and upper left wings, as well as the right aileron.  The patches for the aileron cutout and aileron spar worked out very well.

 One tape near the leading edge, on the bottom of the wing, is at the edge of the leading edge aluminum.  The second tape, behind it, is covering the sewn seam in the envelope.

I still need to put on the bias cut tapes at the tips and the drain grommets.

We have 4 more days of nice weather forecast so hopefully I'll be able to finish the fabric work through silver.

Thursday, February 16, 2017

Aileron Spar Tapes

While I've been waiting for another warm day I've been ironing the pinked edges of all the tapes smooth.  The Poly-Brush is a vinyl so it smooths down nicely at 225 degrees.

I also cut out some patches.  You need a 2" tape over the corners of the aileron spar and a 2" tape over the sewn seam in the n middle of the spar.  Since the spar is only a little over 4" wide it seemed better to just cut out a big patch to cover it all in one piece.

 To make the patches for the aileron spars, and the aileron cutouts in the lower wings. I cut strips of scrap fabric a little longer than each spar and ironed it smooth at 225 degrees.

While holding the fabric over the spar I used the side of a sharp No. 2 pencil to mark the corners of the spar on the fabric.
  I trimmed the fabric 1 1/4" beyond the lines so it will nicely replace the corner tapes.

I then folded the fabric along the pencil line to help it form a corner when it is stuck down with Poly-Brush.  All 4 are made and now I'm waiting for another warm, dry day.


Saturday, February 11, 2017

Finishing Tapes On Root Ribs and Aileron Cutouts


 We had another warm dry day and I was able to get the tapes on the corners of all the root ribs as well as the tape on each root seam.
 Just like I did for the ailerons I made pieces which covered the end rib for the aileron cutout in one piece.  This gives a total of 4 layers of fabric in the aileron end gap, as little as is possible.  I made the cover piece so it goes around the corner .  The spanwise tapes for the cutout will overlap it to close the corner.

Hopefully I can start the spanwise tapes on the next warm day.

Thursday, January 26, 2017

Finishing Tapes on Aileron Ribs


 We had another warm dry day today so I was able to get the finishing on the aileron ribs.  It was very windy so I worked on the deck outside my attic.  A little crowed but it was out of the wind.
 For the inboard ends of the ailerons I made patches to wrap the inboard ends so there would only be 2 layers of fabric in the aileron gap.  I marked and ironed the corners so they would fit snugly on the end.  I also made a tab so the fabric wrapped around the front side of the spar.

On the top and bottom the fabric extends 1" beyond the structure just like it would with a 2" tape.  I'll do the same thing with the aileron cut out on the wing.


Wednesday, January 25, 2017

Rib Tapes On The Last Wing Panels


Today was a beautiful, dry, 70 degree day.  I was able to get the finishing tapes on rib for the last 2 panels.  Still lots of tapes to do as we get nice days.  Pretty nice for late January.

Sunday, January 1, 2017

Rib Tapes on Upper Right Wing


We've started the new year with a warm dry day.  I was able to get the rib tapes finished on the wing Rowan and Duncan helped me with at Thanksgiving.  I also got the doilies on the inspection rings for the lower right wing and Poly-Brush on the reinforcing tapes.  It's progress so I'll take it.

Saturday, December 24, 2016

Lower Wing Inspection Rings and First Bracing Cable End Wire Wrapped


 I glued all the inspection rings on the lower wings.  I find it helpful to draw pencil lines around the ring and for the doily.  It makes it easier to apply the glue for the ring without making a mess.  Just lightly brush out the excess which squeezes out for a smooth look.  The same with the Poly-Brush for the doily.
I've soldered up my first cable end for the new rigging cables.  My WACO NINE uses wire wrapped and soldered ends for all the 1x19 bracing cables.  The Fly Baby was designed for Nicopress sleeves instead of the wire wrapped end.  The wire wrap only achieves 90% of the rated strength of the cable.  The Nicopress sleeve achieves 100% of the rated strength.  The only problem with the sleeve is you have the end of the cable sticking out to snag things like me, and I already get too many cuts.  I like the look of the wire wrap but don't want to risk having weak joints.  My solution is to use a zinc plated sleeve and wire wrap and solder the free end.  I like the look.  I'll explain the process in later posts when I have a little more time.

Friday, December 23, 2016

Inspection Rings on Upper Left Wing


We had a nice afternoon so I was able to glue on the inspection rings, apply their doilies and fill the reinforcing tapes with Poly-Brush.

Saturday, December 17, 2016

Rib Lacing Tips Updated and Last Wing Panel Lacing Done

Go back to my last posting.  I've added some pictures and more tips on rib lacing.

The right lower wing is now laced.  I still need to lace the aileron but I may save it for our January EAA Chapter 1563 meeting and do a hands on demonstration of rib lacing.  Sounds like fun to me.

The last few stitches in front of the aileron cut out were sewn working from the aft end to feed the needle and standing at the leading edge to tie the knots.  I just couldn't get the brain to tie them from the aft end.  It was another good use of multiple needles.  I just kept walking around the wing pushing the needle around each rib at on the aft side and then tying the knot at each rib while on the front side.


While I wait for warm weather I need to make new bracing cables.  Many of the old ones are rusty, etc.  I've also got to finish some of the cowling details now that the parts are all painted.


Monday, December 12, 2016

Lacing Lower Left Wing and Tips on Rib Lacing


The lower left wing is next to Rib Lace.  The stand was easier to attach to the fittings at the root end by just passing the dowel through the fitting holes, like it was done on the Cessna 140 wing.  I put some pieces of plastic tubing to keep the wing from sliding on the dowel while rotating.

The only real problem is that the 9 degree angle of the ribs makes rotating the wing a little weird, the stand pivot is not parallel to the wing centerline.  If you're not doing a lot of rotating it works well enough.  I should just make a new support piece that fits the wing fittings and with the 9 degree offset.

The reinforcing tapes are on and the stands work OK with the wing tipped like this.

We're ready to rib stitch.

I find it easier to do the stitching sitting in my tall work chair.  You're close to the knot while tying and can easily look under the wing to pass the needle through the holes.

I also find flat (braided) cord get tangled less than round (twisted) cord which wants to twist into a mess all the time, not so with the flat cord.

 We're lacing the fabric to the rib so every knot starts with a loop around the rib.  If you are right handed, like me and as shown in all these pictures, go down on the right side of the rib, around the bottom and back up on the left side.  You should be able to take all these pictures and mirror them left to right and see how to do this if you are left handed.  It works both ways and there is no requirement to do it right handed.


 For the starter knot Pull the needle through leaving about 8" of cord sticking out on the right side.  You need enough to get a good grip to pull the knot tight.  I also leave enough to pull the loose end back down through the wing, we'll get to that.  I've got the needle parked in a hole so I don't have to hold it.

You can start at the leading edge or the trailing edge as well as anywhere you run out of cord long enough to make it easy to pull knots tight.  The old method of knots on top of the wing included a splice knot.  With the hidden knot method just lock your last stitch with a half hitch and start a new piece of cord with a starter stitch.
 The starter stitch is a square knot with a half hitch on each side to lock it.  A square knot will slip without the half hitches.

The Poly-Fiber manual has a simple way to tie a square knot.

Make a "U" shaped loop by folding the free (needle) end back on itself.

Fold the loop over making 2 ears.

Fold the ears down, pass the short end through the ears, and pull it tight.


 If you want to see that this actually makes a square knot you can move the cord around to see it really works.
 Pull the knot almost tight to the rib leaving room to easily pass the ends back through to make half hitches on each side of the knot.  Don't pull them tight yet.


 Pull the square knot tight then tighten each half hitch making sure the knot is tight after tightening each hitch


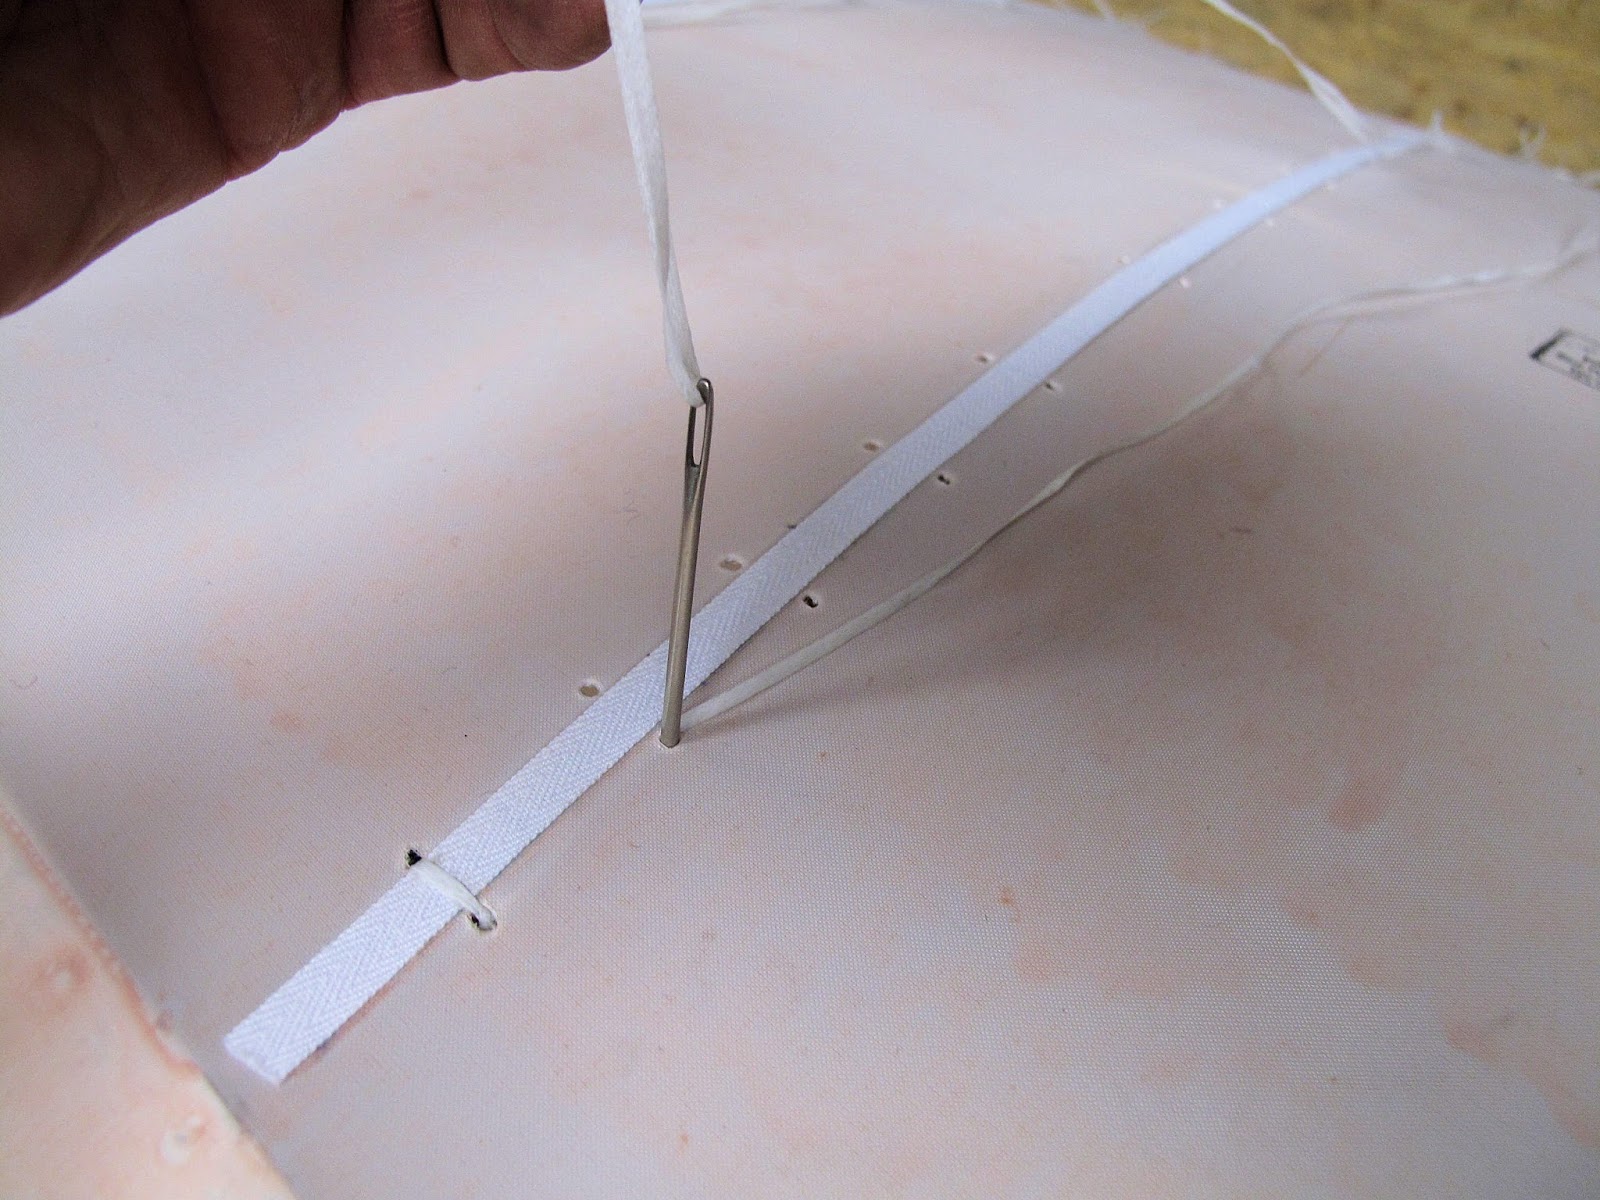
 To get rid of the short end use another needle to pass the cord back down through the wing.

Pulling this end through the wing makes it easier to get the knot to slide just below the fabric while pulling the knot to the side of the rib with the free (needle) end of the cord.

Then trim off the excess sticking out the bottom.


 As I'm working I point the curved end of the needle in directions which make it easy to feed the needle from hole to hole.  When hiding the cord under the fabric, from knot to knot, I tip the end up so I can see where it touches the fabric and move the needle forward or aft to get the tip in the hole.

Pull the cord straight out and parallel to the wing surface.  Pulling the thread up or to the side can cause it to tear the fabric.  It's fixable just like any small cut but avoid tearing the fabric.


Some times as you are doing the lacing, the knot you just tied ends up setting on top of the cap strip rather than down through the hole.  Before I pull the cord tight to the next stitch hole I leave a loop big enough to grab easily.  Then pull the cord perpendicular to the rib to move the knot over to the hole.  You can pull to the side here because the knot holds the cord to the rib so it can't tear the fabric.  Then as you pull the cord tight to the next hole it's easy to push the knot down into the hole.

The needle goes back down the same hole it just came out so you can make the loop around the rib.  This time I point the needle tip toward the rib, the same when you come back up the hole on the other side of the rib.  This way the angle of the needle is more nearly vertical, fore and aft, and as the needle tip touches the rib it goes easily into the hole on the other surface of the wing.

While pushing the needle down and back up around the rib, hold onto the free cord, behind the needle, to naturally keep the fixed end of the cord on the far side of the needle and the free end on your side of the needle.


If you're holding the free end this way it's easy to be sure the needle comes back up with the cord forming a loop around the needle such that the end of the cord from the last stitch is on the side of the needle away from you and the free (needle) end of the cord is on the side toward you.

This makes what Carol, at Poly Fiber, calls an Island with the needle and cord forming her Palm Tree in the island. you can click on her name to link to her video and I have a video at the end of this posting.

You hold the free end of the cord with your hand and use your fingers to form the island into a triangular shape.


The needle goes under the side made by the free end going down into the hole.

The needle is moved forward so the needle can pass under the tight cord from the last stitch.

The needle then passes the palm tree cord on your side and crosses on top of the left side of the triangle.

All of this happens in almost a quick flip of the needle once you get into it.


Now pull on the palm tree cord to pull out all the slack.

As the knot tightens it looks like a figure 8 on it's side.

Once it's tight you see the X of the 8 on top of the needle letting you know it's tied correctly.

As the needle passes through the knot, swap hands to keep the palm tree cord tight as you pull it to the right to finish tightening the knot.

If as you finish tightening it you do it with a quick jerk to the right the knot will usually end up just under the fabric.

The video is about 7 minutes.  The blog software made it rather grainy looking.

I find it takes me about 2 minutes to thread the needle and make the starter stitch and knot.  After that each stitch takes 1 minute.  The last stitch gets locked with a half hitch but it only takes an extra couple seconds to do them.  Based on the stitch spacing, etc. on the Fly Baby I've got 79 Starter knots and 523 Modified Seine knots.  That's about 11 1/2 hours of lacing.

I also start a needle at each rib so when you get near the middle where you can't reach you just keep working your way around the wing pushing a needle through the wing or tying a knot.  With some light on the back side of the wing you can easily look through a knot hole to see where the hole is on the other side of the wing when passing the needle through.

The weather was warm today so I was able to get the first coat of Poly-Brush on the last wing panel and aileron.  I'll be able to finish lacing the wings.