Saturday, December 31, 2011

Dawn Patrol - July 1965

 Dennis:  Each summer Ed Dalton held a very popular Dawn Patrol (pancake breakfast) at Dalton Airport in Flushing, Michigan (about 6 miles from home).  Some nice summer days were spent bicycling to the airport for the day.  Mom usually packed a sandwich and apples were available at Salem's orchard about a mile before the airport.  If you were helpful enough you could actually get a ride once in a while.  Life was good.

Friday, December 30, 2011

Engine - Summer/Fall 1965

 Dennis:  The engine is a Continental A-65-8, no starter or generator.  I think the best engine for this plane is the one we later installed, a C85-8.  It's only a few pounds heavier for the extra 20 HP.  This would be a great plane for a small in line 4 in the 80-100 HP range with a reduction to keep prop speed under 2,000 RPM.  It's just to slow for a faster turning prop.  The engine was in good shape so most of the work was cleaning and repainting.


 Once the case was assembled the engine was bolted to the plane and the rest of the assembly accomplished on the plane.  Why buy an engine stand when you have this neat roll-around stand.


I don't remember where the prop came from. It may have been the prop off the T-craft project.  The T-craft was a lucky find that the fellow was willing to sell for $150 because he had a bad leg and his house was about to be bulldozed for Urban Renewal.

Thursday, December 29, 2011

Covering The Fuselage and Tail - May 1965

 Dennis: In 1965 Razorback was the hot fabric for covering.  In May of 1965 Stits (now Poly Fiber) had just issued the first copy of their covering manual.  Razorback was a fiberglass fabric which was impregnated so dope would stick to it.  The important advantages were it was a lifetime fabric and the fabric would not burn, the dope would though.  The disadvantage was the price.  I also think it was heavier.  The dope could be rejuvenated if you didn't cover it with enamel, no polyurethane back then.  As with Poly Fiber seams could be made with just overlapping the fabric for a very strong joint.  We got enough fabric to do the fuselage and tail for free by putting on  a demonstration at a Chapter meeting.  I've since also used Grade A cotton, Ceconite, and Poly Fiber.  I'll choose Poly Fiber any day.
 For our demo we started with the tail surfaces.  You apply the fabric smug, no shrinking.  The fabric is pulled up tight with the dope, which by the way just keeps on shrinking.


 After the first coat of Dope the ribs are stitched and tapes applied just like doing cotton but with RazorBack tapes.

 The top and bottom of the fuselage were covered first and the sides applied to form the needed overlap.


 We didn't have quite enough to finish the rudder.  At this point everything but the rudder is doped and taped.

Ready for the engine.

Wednesday, December 28, 2011

Controls - Winter 1964

Dennis:  With the plane on the gear and the tail surfaces installed, the next project was to make the control stick and related linkages.  While most of the work is cutting out steel pieces on the band saw and drilling holes, this is one project where welding is needed.  Thank goodness for EAA Chapter members who built steel tube planes and learned to weld.  I think the rudder pedals are from a CUB.


The throttle quadrant came from a surplus store in Detroit.  It works but your knee hits it.  It's mounted on a piece of 3/4" plywood to get all the cables to hook up without hitting the structure.  Eventually a more complex mount allowed it to be tipped at an angle to the side giving better leg room.
Al McArthur looking at some parts being made.  The oil heater is behind him.  Man could you get it hot in there.
A brake we made for bending the heavy (.090") steel fittings.  I'd forgotten those gloves, from the surplus store also.

Tuesday, December 27, 2011

Tail Surfaces - Summer 1964

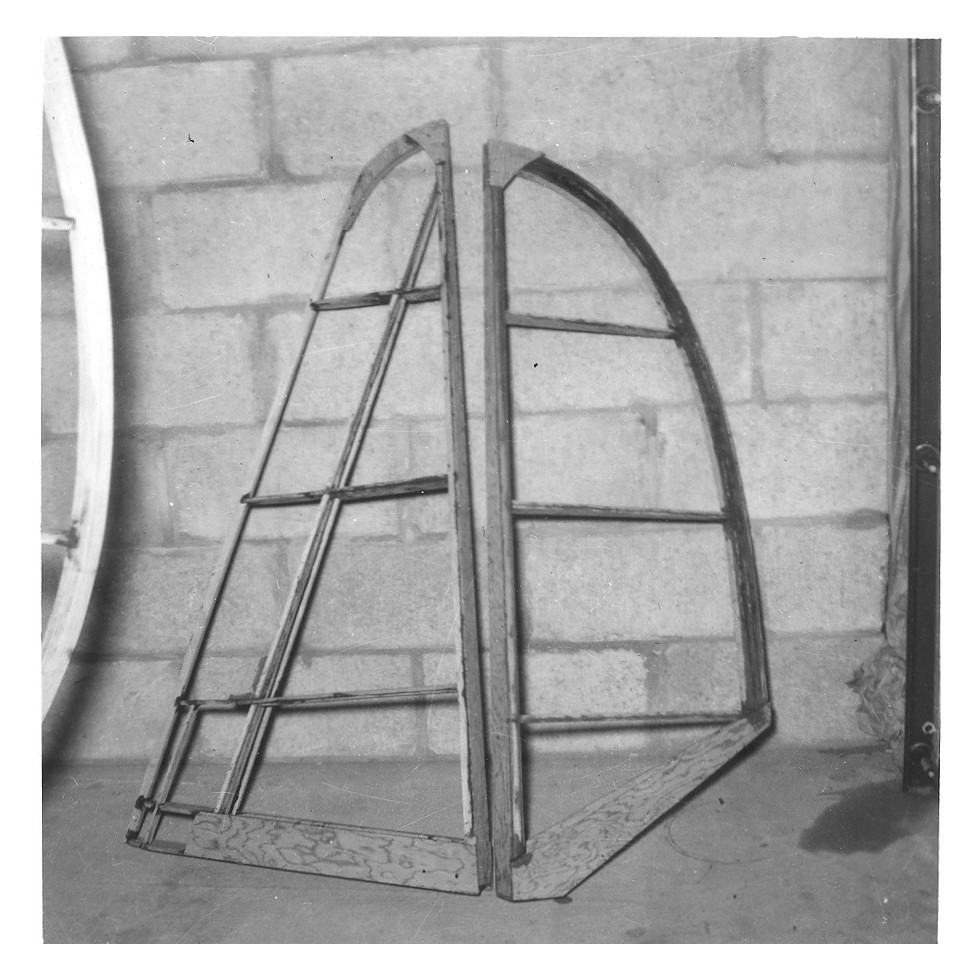
 Dennis: We started building the tail surfaces with the rudder bow. Strips of spruce were sawed 1/8" wide to laminate into the curved trailing edge.  The shape was drawn on the table and covered with waxed paper.  Nails were driven into the table about every 2" - 3" to bend the strips around.  The hardest part was that you need to quickly get glue on both sides of all the pieces so you can clamp it all together to dry.  We did this by spreading glue on one side of each strip with it laying on the table. Then make a stack of strips adding glue to the second side of the strip on top of the stack.  When the stack is all glued put a clamp on one end and then lay the stack on it's side as you bend it to shape.  It's a bit messy and easiest done with 2 people.  At least today we have latex gloves to wear doing such messy jobs.
 The ribs and spar are made from pieces of 1/8" plywood with spruce sticks glued and nailed to them.  All of the sticks were cut with the planer blade on the Shop Smith.  It was 2 years before Bill got his nifty machine back.  The Shop Smith is a worthy investment if you're building an airplane, you can even cut a lot of metal with one.  They are also available used for good prices.  We had to leave closed up pieces like the box spars for the tail open until an inspector had checked to make sure they were properly varnished.  Then we could add the second side of plywood.  They were pretty good about showing up.  I think the feds had an office at Bishop airport.
 The elevators were built the same as the rudders. Carving the laminated trailing edge to a streamlined shape is easier with a disk or belt sander starting with a very coarse grit like 24 or 36. Be sure to use a dust mask.
On the inboard end of the elevators there is some structure where the elevator attaches to the control bell crank.
The structure of the Horizontal Stabilizers is built like the fin on the fuselage, a box beam main spar and a diagonal spar made of a piece of 1/8" plywood and 2 sticks glued to it in a sort-of "C" section.
The finished woodwork for one side.
The stabilizers are attached to the fuselage with some "C" shaped fittings at the root and brace wires.  The wooden block in front of the front spar is for a pin to hold the wing when it is folded.

The hinges are just folded pieces of steel forming an open "C" shape with the back of the "C" bolted to the spar.  The pivot bolt goes through the top and bottom of the "C".  Alignment of these pins is important to the surfaces moving freely.  With all I've learned about matched hole construction and bending metal since we did this, it would be easy to get them aligned.  We had them so the surfaces moved and the plane flies just fine.

Some care was needed to get the 2 side so the hinges were all on a line with all the rigging installed.  Pete gives some simple methods for this.


We Nico-pressed all the cable ends, generally with 2 Nico-press sleeves.
Once everything was done structurally the leading edge aluminum was nailed on.  More time with pliers and a tack hammer.  That's one of the tack hammers we made in 7th grade metal shop class.  I still use mine.
Ready to Cover.

On the Gear - Summer 1964

Dennis: The assembled fuselage was nice but a bit of a pain to keep moving around.  It took 2 people to lift it and move it around.  The landing gear was clearly needed.  We didn't know how to weld so help was needed.  A fellow who was a welder at Buick tried to weld them but it was quickly apparent he did not know how to weld this stuff.  I think Ray Shelby finally welded the the parts for us.  It involved welding some thick walled tubing onto some .095" steel fittings.  The parts came out fine and after painting were bolted to the gear and the fuselage.  Because we bought surplus bolts we used 3/8" bolts instead of 5/16".  It doesn't seem like a big difference but there are a lot of them and a few pounds of weight was added.
Once the lower fittings were bolted to the gear legs they could be drilled for the axle.  A hole saw was used.  It worked fine.  You just have to go slow and keep a firm grip on the gear legs.  Dad's brother Bruce is just visible in the picture on the left.  He must have been working or on his way home since he's wearing a suit and some fancy socks.  Bruce was a detective.  The other person behind the ShopSmith is Al McArthur.  He started building a Fly Baby after this but his wife eventually ended the project.  I think he cut it up and hauled it to the dump.
Ready for the axle.
Dad needed to make sure the the gear was on correctly.

The axle is welded to the plates on the gear legs and wire braced for a very rigid gear.  We originally used some 6.00x6 wheels and tires because we got them cheap.  After a couple hard landings it was decided to change to the recommended 8.00x4 wheels and tires.  The difference in shock absorption is worth the cost, they have gotten expensive.
OK, maybe we don't really need a picture of the bottom of the fuselage, but it was fun to do. Little brother Donald, Dad, and Wally. I think Diane is in the shadow to the right but I can't adjust the picture enough to make out who it is.
Really starting to look like an airplane.  You really get a sense for how small our house was with the plane in front of it.  It never seemed small, just home, a good home.