Once the plane was assembled at the airport I finally sat in it. I was shocked to find out I couldn't twist my right heel far enough to operate the brake on that side. I was scheduled for a hip replacement on Sept. 19, which would solve the problem, but until I recovered from the surgery the plane was not flying. I had been asked to bring the plane to the 50th Oshkosh Fly-in, because it had been there for the first one in 1970. The only way it was going anywhere was on the trailer. This meant we needed to add racks for the wings.
I made the actual racks from 2x4s and 3/4" plywood. The plywood supports are spaced to be at a full rib, and glued and screwed to the 2x4. The outer edge of the 2x4 is cut at an angle to fit the leading edge of the wing. The opening where the leading edge sets is wide enough for some 3/4" thick padding.
The vertical poles are "U" shaped grip strut material from Lowes. 2x4s were clamped to the posts to hold everything square while I drilled the holes for the eye bolts and the bolts at the top of the plywood pieces. The eye bolt goes through the outer plywood, 2x4,and inner plywood.
John Gaertner suggested weldable hinges, which I got from Tractor Supply. I bolted one to the bottom of each post. I selected hinges with a pin of about 1/4" diameter so I could replace the pin with a 1/4" Grade 5 bolt. This allows the racks to be easily removed from the trailer.
The racks fold out to the side to allow the fuselage to be loaded on the trailer. To make this work well and to have all the weight on the hinge, not the bolts, the hinge is placed so the loops set on the trailer frame. The posts are bolted to the hinges on the same side with the end of the posts touching the loops of the hinges.
I put a spacer on the grade 5 bolt rather than cut it shorter. They only came in a few length increments.
The racks were located on the posts as low as possible but high enough to clear the fenders when raising or lowering the racks.
The grip strut came in 10 foot lengths and I didn't cut them off until everything was done so I wouldn't make them too short.
With the racks done some bracing was added to assure the racks don't move enough for the wings to rub on the fuselage.
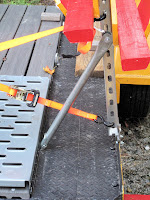
At the bottom there are ratchet straps and at the top there are braces made from 1" EMT Conduit.
The top braces do most of the work. They're held on with self locking nuts on bolts in the holes of the grip strut.
The joints are color coded to assure it all goes together correctly.
There is almost always a breeze outside so we needed some way to hold each rack in the vertical position until all the cross bracing was installed. I used a scrap of the 1" EMT and an eye bolt in the trailer floor. When you stand up a rack you have a helper position the bottom end of the tube over the eye bolt and install a 1/4" safety pin with a bale catch. It holds it very well in a light breeze. I wouldn't install the wings in a high wind anyway.
To protect the wings in the racks we got some 3/4" thick Noodle Kickboards at the Dollar Tree. They cushion well but don't compress flat like foam rubber. They have a curve on each end. We cut off the concave curve end.
To attach them we used Outdoor Carpet Tape. It seems to hold them on just fine.
Trailers done. Let's go to a fly-in.
Monday, September 23, 2019
Subscribe to:
Post Comments (Atom)


No comments:
Post a Comment