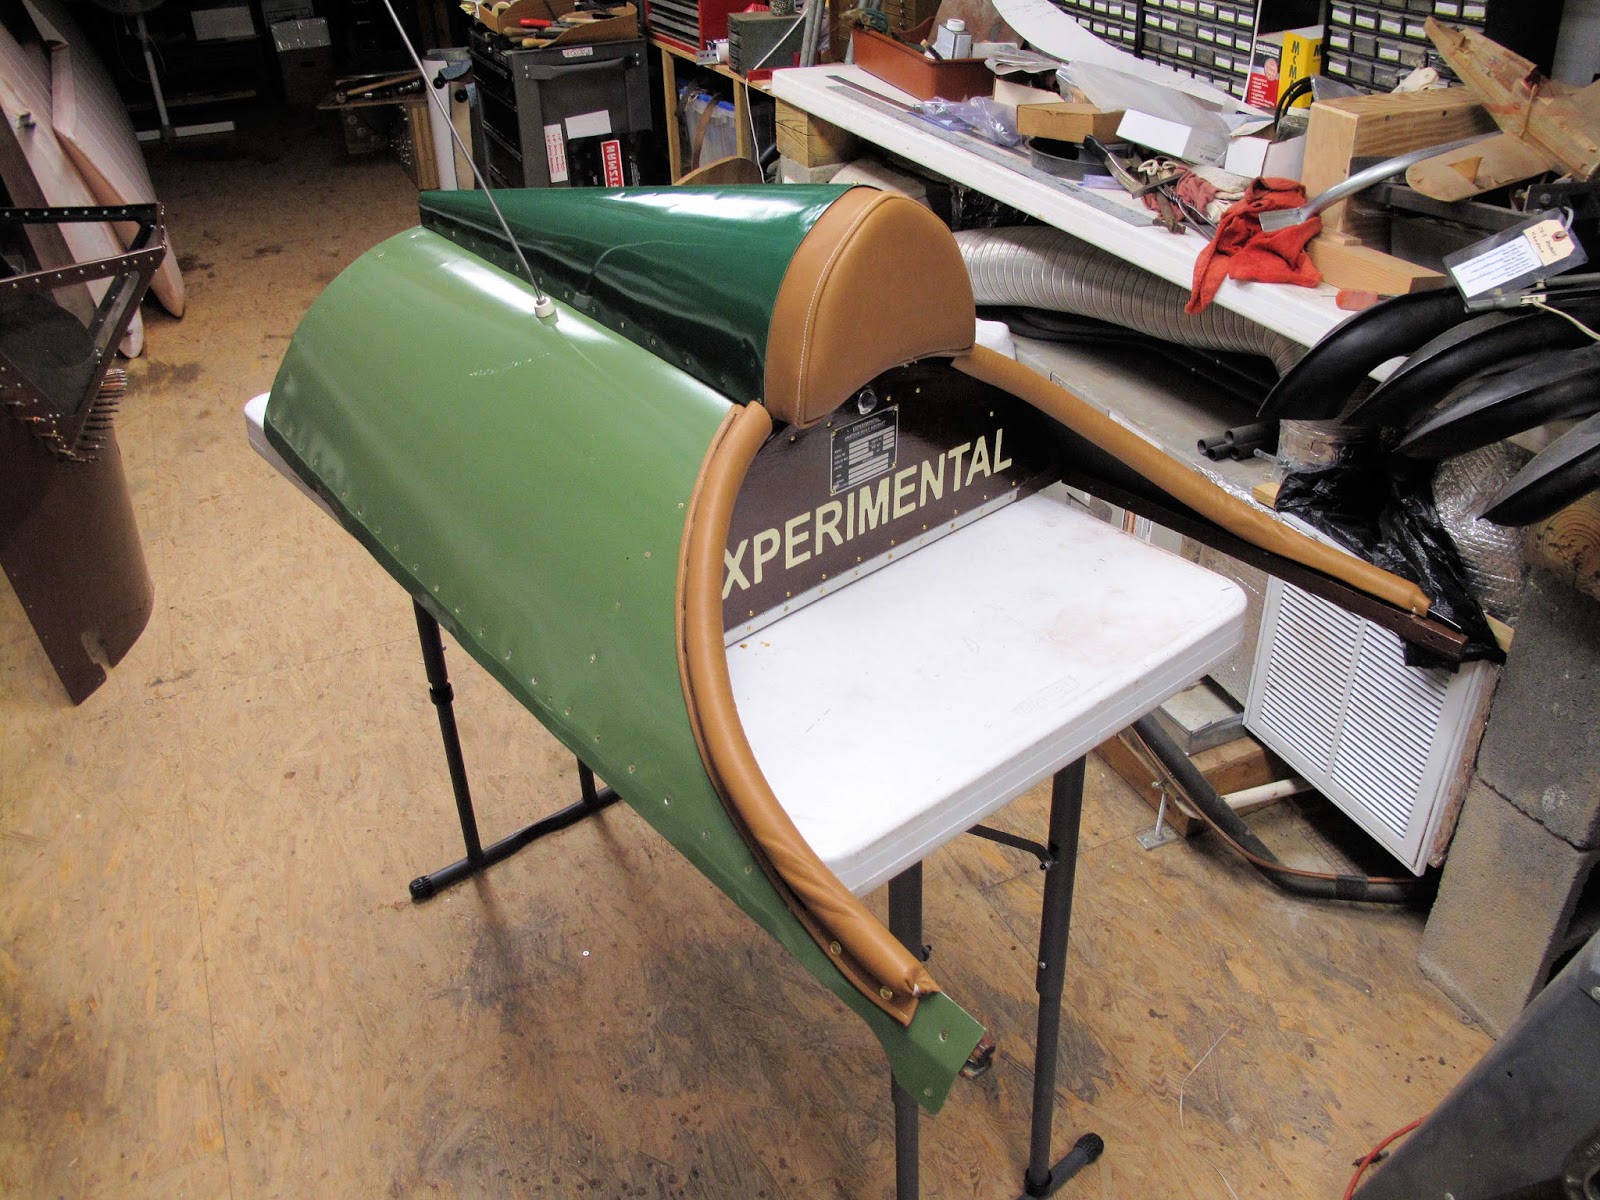
The plan for the headrest and baggage compartment was to repaint the aluminum, replace the headrest cover with leather, to match the seat, and then use some of that leather to cover the cockpit coaming.
When I removed the sheet metal I found many of the joints on the headrest had come undone. The gussets were fine it was the joints on the bulkhead and cross piece which did not hold. None of these had the snug fit required for Resorcinol glue. I cleaned them up and re-glued them with epoxy. They should last this time.
I used a piece of 2" foam rubber for the padding.
I sewed up a new headrest cover from the seat leather.
The cover was nailed to the bulkhead using my
brad nailer.
There were also some loose joints in the baggage compartment frame so I re-glued them and painted the inside white to make it a little brighter inside.
The aluminum pieces were stripped, sanded and repainted. I painted the inside of the cockpit area flat black and the inside of the baggage compartment white.
The aluminum pieces were screwed back onto the frames with brass screws. Steel crews just get rusty in wood.
The headrest is screwed to the skin of the baggage compartment.
The baggage door was covered with Naugahyde. I decided to cover it with a piece of 1/16" mahogany plywood. My original plan was to stain it with a dark stain, then mask the word Experimental (required by regulations), sand blast away the stain on the letters, and varnish it. That all worked perfect but the color of stained mahogany is not enough darker to see the difference once it's been varnished. This would have worked with birch plywood.
Instead I painted the text a cream color and moved on. I didn't want the word Experimental on the outside of the plane.
I had pre-drilled all my screw holes and then sprayed the door and the wood with contact cement.
The problem was how to get all the holes aligned as the 2 parts mated because there is no moving it once they tough. I used some pin punches to align them at the bottom as I brought them together.
A couple clecos were used at the top and then the parts were pressed tightly to set the glue.
It worked and all the holes matched.
The frame for the cockpit coaming is a piece of 3/8" steel tubing Pop-riveted to the aluminum skin. It worked as good as a rolled edge. You probably don't want to stand on it but it's been there since we widened the fuselage with the stringers, and the skin has no wrinkles after about 45 years.
To cover the structure we used a piece of 3/4" heater hose. The hose was split so the curve naturally fit the coaming. There isn't room for it to fit on the inside so it needed some of the hose removed at the ends. If I were making new skins I would make them just tall enough to avoid the fit problem at the forward end.
Originally we had Naugahyde glued over the tube and wrapped to the inside. That worked but I lost one of them while flying one day.
Before we widened the fuselage with the stringers we had the cover laced to the skin. That's how it's done on my WACO NINE so that's what I did this time. No more pieces blowing off in flight.
I cut 2 strips of 6" wide leather. I glued the folded edge, where the lacing will go, and then sewed near the edge for a finished look.
I found I had a problem gluing the ends to the hose. I wiped the hose with MEK and that let the contact cement stick.
I used the calipers to figure out where the front of the bulkhead was so I could locate a hole just in front of the bulkhead. I then located the rest of the lacing holes so they were evenly spaced. I punched 3/16" holes in the leather but drilled 1/8" holes in the aluminum so I could cleco the leather in place as I worked. Once I was ready to do the lacing I re-drilled the holes to 3/16".
To locate the holes in the leather on the inside I just pulled the leather tight down and put a tick mark at the bump made by the end of the cleco.
Once the holes were punched on the inside I used some 1/8" Pop-rivet washers to allow the clecos to hold the leather in position.
I used a 45" boot lace and started at the forward end so the knot would be in the baggage compartment. By having a hole just in front of the bulkhead the cord just wraps around the frame while lacing. The door doesn't fit so tight that the lace gets in the way.
I didn't worry about which end should be longer at the start in order to get even ends for tying the knot. Once it was laced I just worked some slack around to get the ends even.
I knotted the ends with a square knot locked with a half hitch on each side. It works.
I like the look and it's very secure.
At the forward end I located holes to use the skin crews to hold the leather. I got some brass upholstery washers and one size longer crews.
At the forward end I drilled a hole in the aluminum and pulled the leather tight with some rib stitch cord. Other than a small wrinkle in the leather I like it.
It's ready to go back on the plane.
The lock in the baggage door uses the glove box key from our old '58 Chevy Station Wagon that we used to haul the fuselage to Swartz Creek High School for a display back in '64. I think that's the station wagon we used to bring the engine home from Andy Anderson in Illinois. Ah the good old days.